
You can purchase a device at a great price with povo certified pre-owned smartphones!
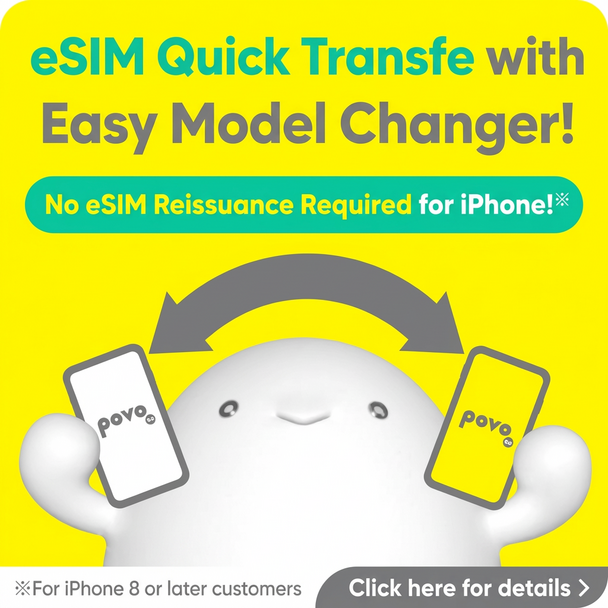
Easily reissue your eSIM with eSIM Quick Transfer!
*This procedure is compatible with iPhone 8 and later.

With" Smartphone Gigatrade "you can exchange your smartphone for gigabytes (GB) at a great price!
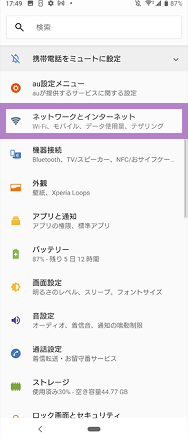
Please check the following two points for the new device you will be using.
*For more details, click here
[When purchasing from au Online Shop]
For information on purchasing devices from au Online Shop click here
[When purchasing from the device manufacturer's online store]
We will transfer data from your current device (old device) to your new device and back up your data in case of an emergency.
Unlock the SIM on your new device.
Please check here for SIM unlock instructions.
Devices purchased from au Rakuten Mobile and devices released after September 30, 2021 do not require SIM unlocking.
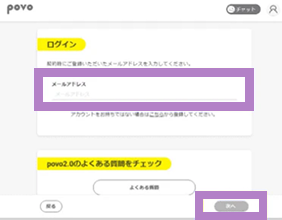
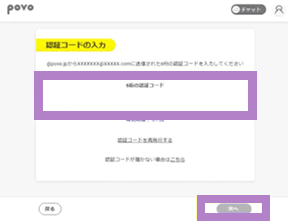
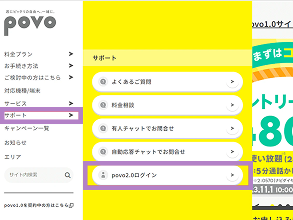
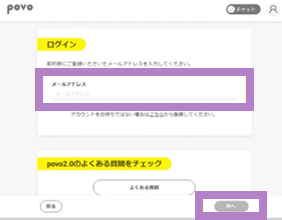
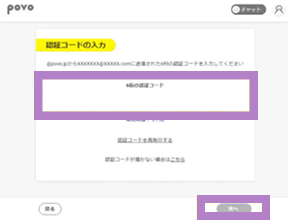
[povo2.0 registered email address]
We will send you the authentication code required to log in to your registered email address.
If you are unable to receive emails due to a change in your email address, please change your registered email address in advance.
[Apple ID or Google account]
Make sure you can log in and have your account information ready.
Please note that if you do not know your ID or password, your data cannot be restored.
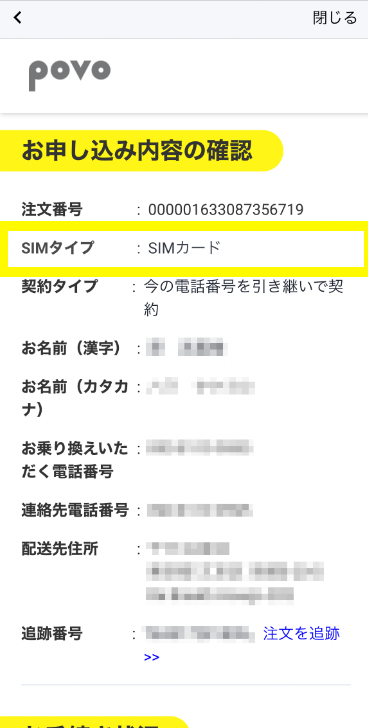
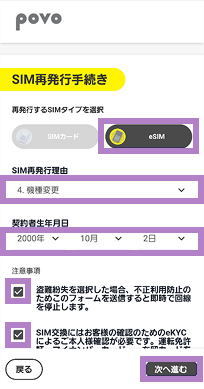
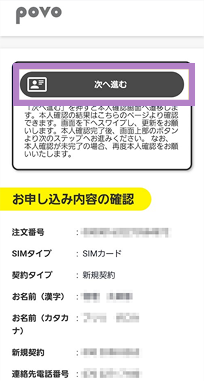
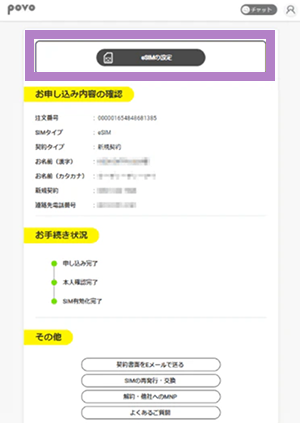
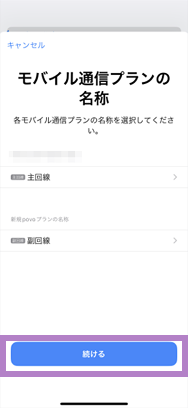
Please select the SIM type for your current device (old device) and your new device (new device) from the options below.
If you are currently using povo2.0 with a SIM card and plan to continue using the SIM card after changing your model, please check the following.
Simply remove the SIM card from your current device (old device) and insert it into your new device (new device) to continue using it.
*If the SIM card size no longer fits after changing your model, you will need to have it reissued.
For details, please follow the procedures described in "SIM change procedure" and "SIM card delivery address setting" here (Changing from eSIM to SIM card).
*Some models require the use of a SIM removal bin.
Please use the SIM removal pin included when you sign up for povo2.0.
*If you have reissued your SIM card, please activate the SIM using the povo2.0 app before proceeding to STEP 02.
For details on the procedure, please follow the steps described in "SIM Card Activation Procedure" here (Changing from eSIM to SIM card).
[Check the iOS version of the new device you will be using]
How to update the OS on your iPhone or iPad

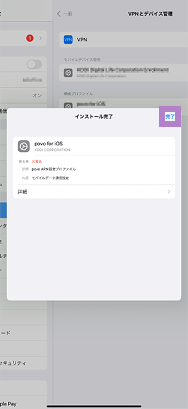
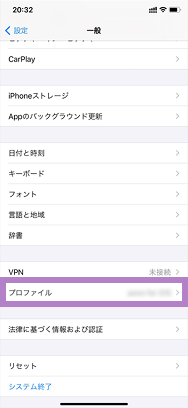
*If you are unable to update the OS on your iPhone, tap here on your povo device to download the APN setting profile and complete the APN setting installation.
[APN setting installation procedure for iPad (for iPadOS versions prior to 17.1)]

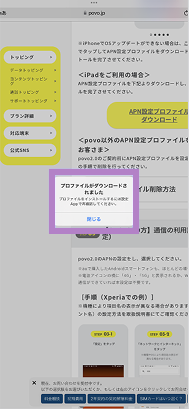

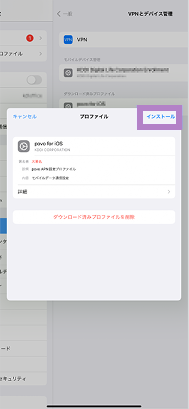
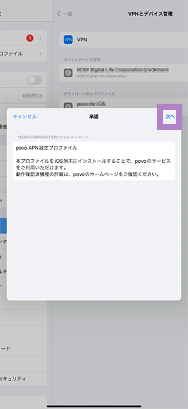
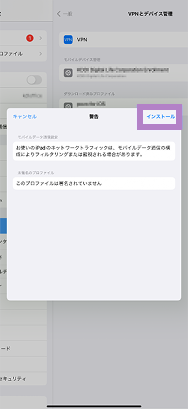

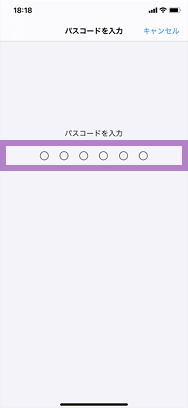
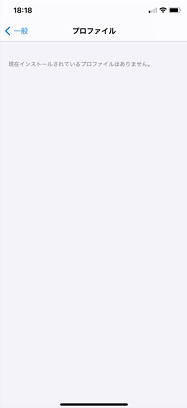
[Customers who have set an APN setting profile other than povo]
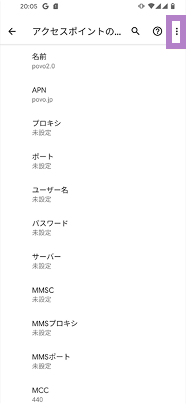
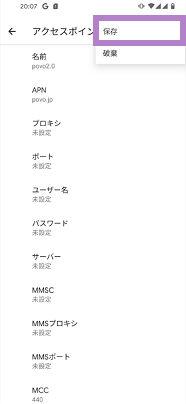
If you have set up an APN setting profile before subscribing to povo2.0, please follow the steps below to delete it.


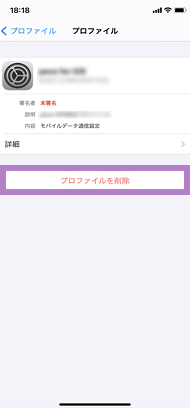
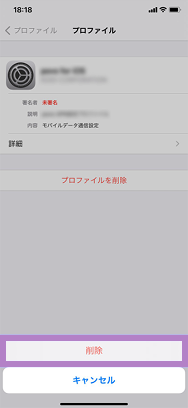
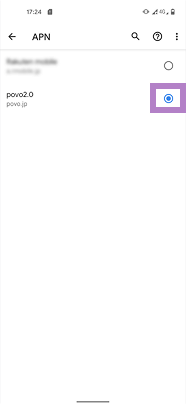
Please set the APN for povo2.0 and select it.
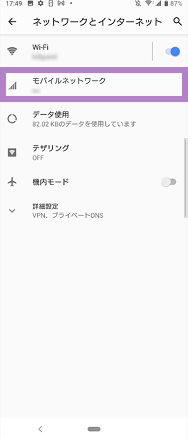
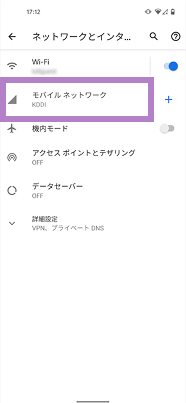
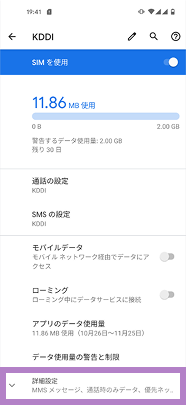
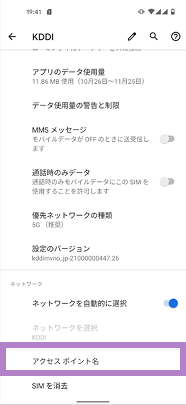
* In most cases, APN settings are required for Android smartphones purchased from au. * If "4G" or "5G" is displayed next to the signal icon, or if data communication is possible with Wi-Fi turned off, this setting is not necessary.
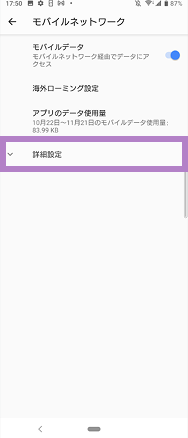
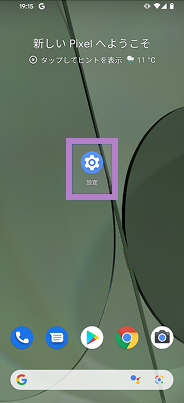
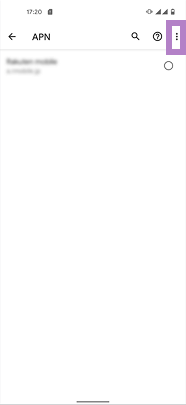
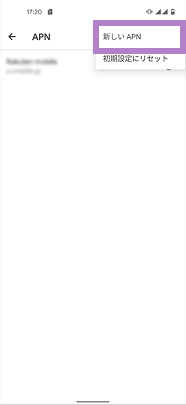
[Procedure (example for Xperia)]
*Item names may be displayed differently depending on the model. Please refer to the instruction manual for instructions on how to set the APN (Access Point Name).
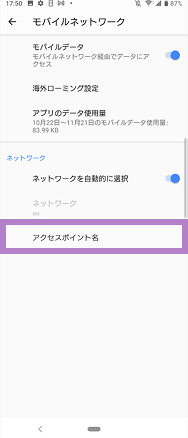
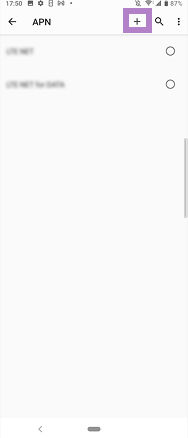
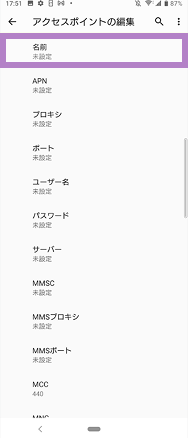
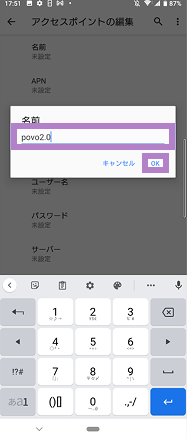
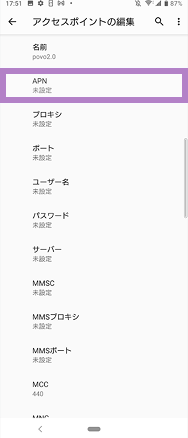

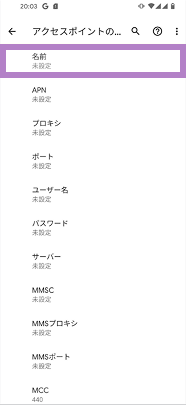
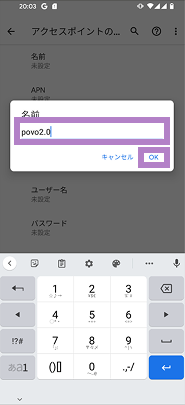
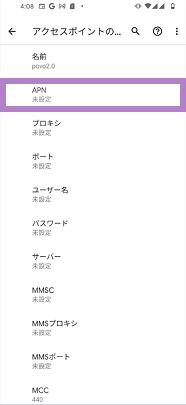
Items to be entered
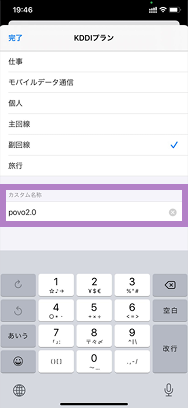
[name]
povo2.0
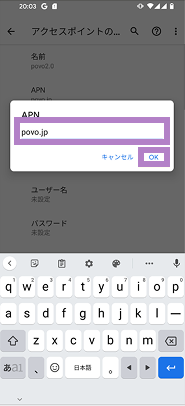
[APN]
povo
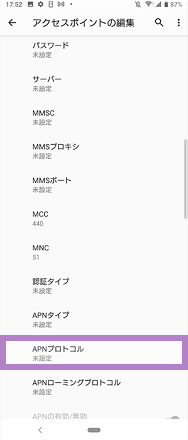
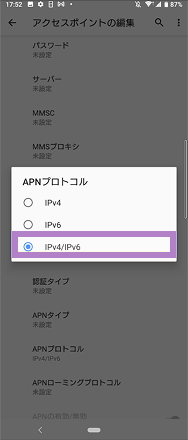
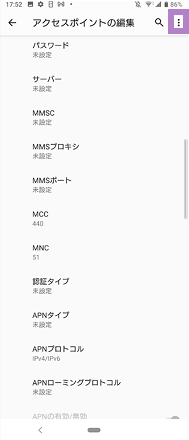
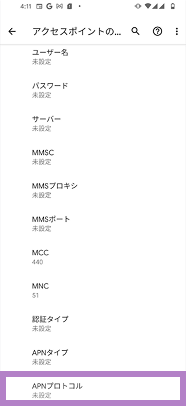
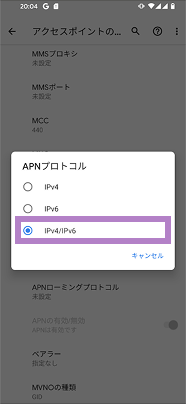
[APN Protocol]
IPv4 / IPv6
If you are currently using povo2.0 with a SIM card and would like to use eSIM after changing your model, please check the following.
Also, for those using iPhone 8 or later, we have listed a simple method for changing models (eSIM Quick Transfer), so please check it out here.
Complete the procedure to change from a SIM card to an eSIM on your previous device
[ procedure ]


*If you are unable to use your previous device, connect your new device to Wi-Fi, download the povo2.0 app, and follow these steps. *We do not accept SIM reissue or exchange requests between 8:00 PM and 9:30 AM.
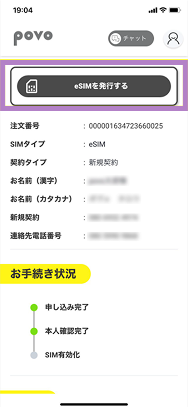
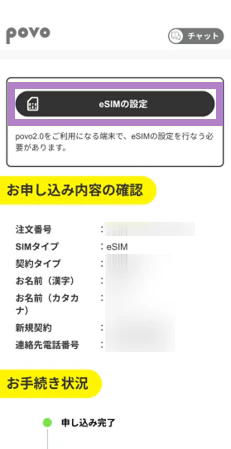
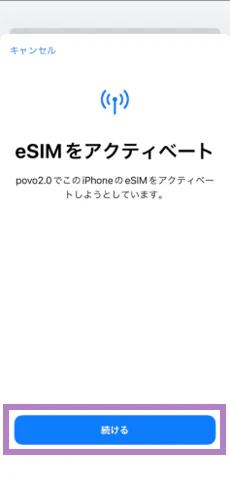
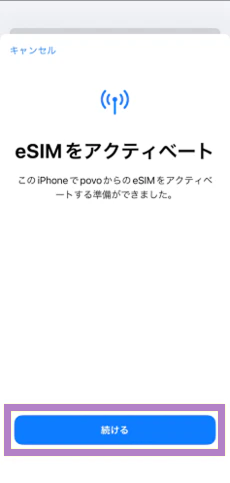
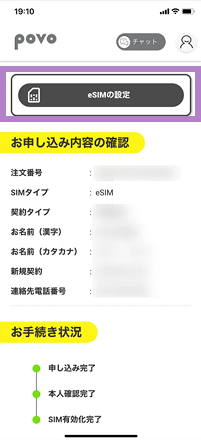
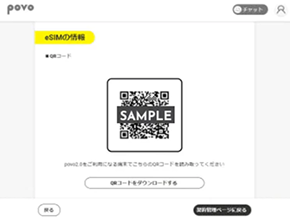
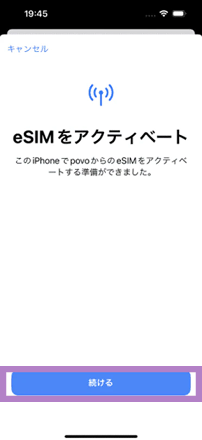
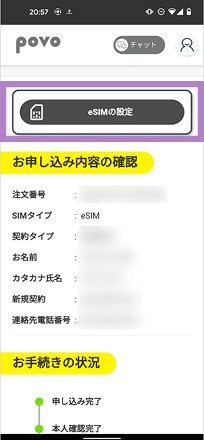
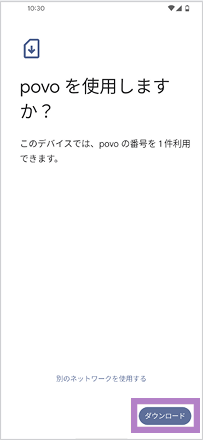
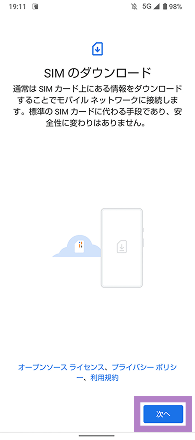
Activate (issue) the eSIM
[ procedure ]
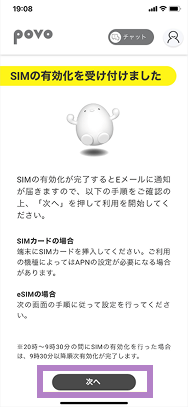
*Identity verification may take some time depending on the status of your application. *Please activate your SIM between 9:30 and 20:00. For details, please click here. *When you activate your SIM, the line will be switched, so you will no longer be able to use your current SIM card.
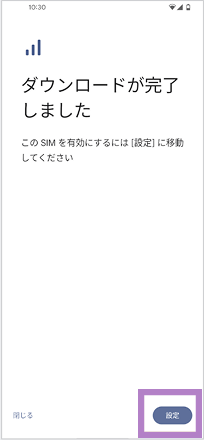
Please be sure to do this on the new device.
*Downloading the eSIM may take some time.
The "Download eSIM profile" button is only available for version 1.24.0 or later of the povo2.0 app. If you are using version 1.23.0 or earlier, or if you are using the 1.24.0 app and are unable to download by tapping the button, please follow the steps here for "If you are using one eSIM device (code entry method)" or "If you have multiple devices (QR code method)."


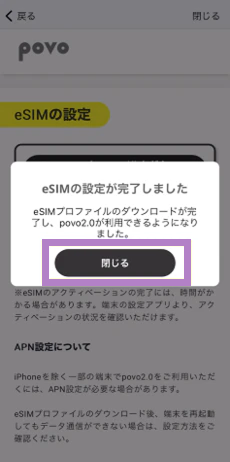
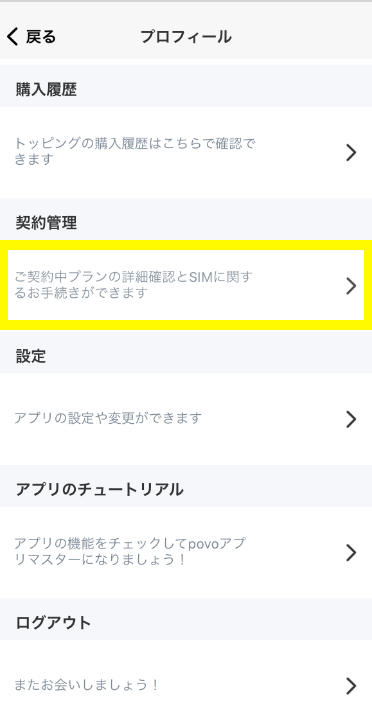
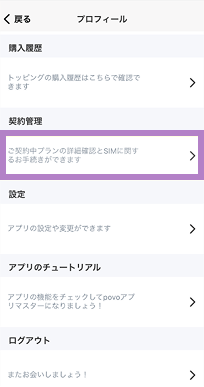
*To move to this screen after transitioning to the home screen, tap "Profile Page" > "Contract Management" in the upper left of the home screen. *Even if you transition to the home screen, please make sure to check the call test and mobile data communication test before purchasing Topping.
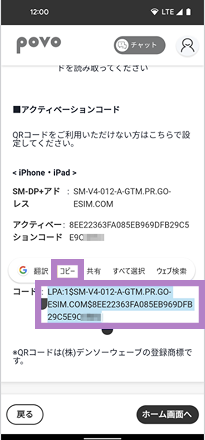
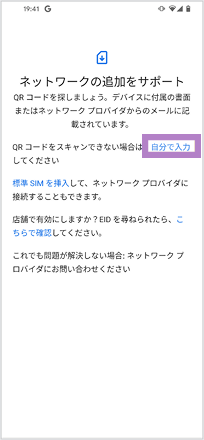
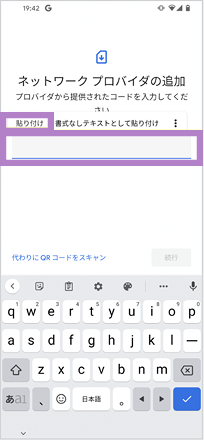
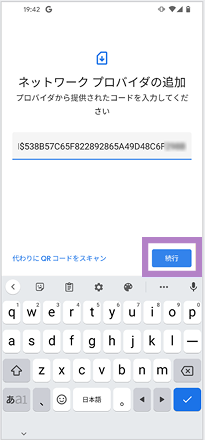
[When using one eSIM device (code entry method)]
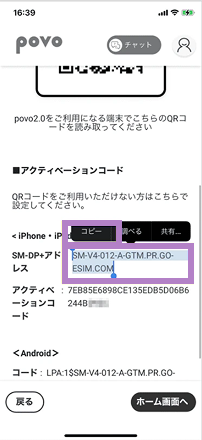


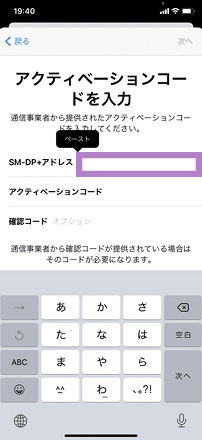
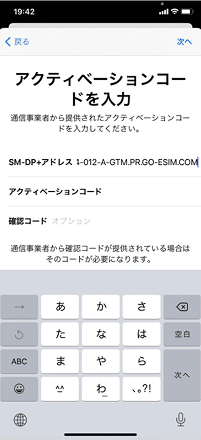
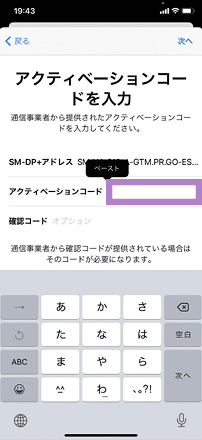
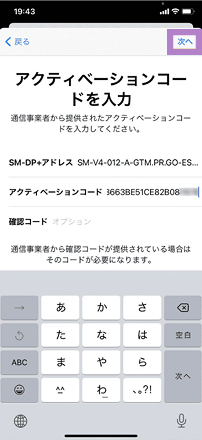


*You do not need to enter a "verification code." *For iPads, select Settings > Mobile Data > Add New Plan > Other... to proceed to the screen for selecting a mobile data plan. *If you are unable to complete the eSIM setup, it may be that the code was not copied properly. Please double-check that you have copied all the alphanumeric characters and try again. If this still does not work, try the "QR code method" below. *To proceed to the screen in STEP 3-1 after returning to the home screen, go to the person icon in the upper left corner of the home screen > Contract Management.
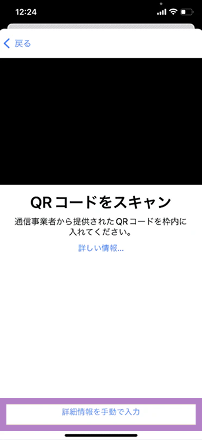
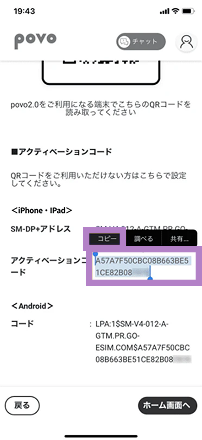
[For those with multiple devices (QR code method)]


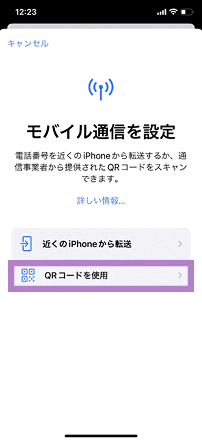
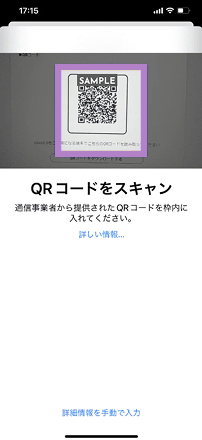
*For iPad, select Settings > Mobile Data > Add New Plan > Other... to go to the screen for selecting a mobile data plan. *Even if you are redirected to the home screen, please make sure to check the call test and mobile data test in STEP 6 before purchasing Topping.
Please be sure to do this on the new device.
*Downloading the eSIM may take some time.
The "Download eSIM profile" button is only available for version 1.24.0 or later of the povo2.0 app. If you are using version 1.23.0 or earlier, or if you are using the 1.24.0 app and are unable to download by tapping the button, please follow the steps here for "If you are using one eSIM device (code entry method)" or "If you have multiple devices (QR code method)."


[When using one eSIM device (code entry method)]
*If you are unable to complete the eSIM setup, it may be that the code was not copied properly. Please double-check that you have copied all the alphanumeric characters and try again. If this still does not work, please use the "QR code method" below. *To return to the screen in STEP 3-1 after returning to the home screen, go to the person icon in the upper left corner of the home screen > Contract Management.
[For those with multiple devices (QR code method)]


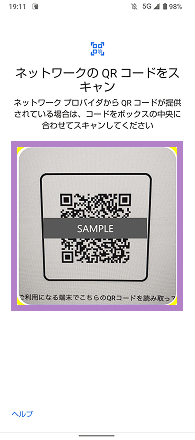

*Please purchase Topping only after checking the call test and mobile data communication test in STEP 6.
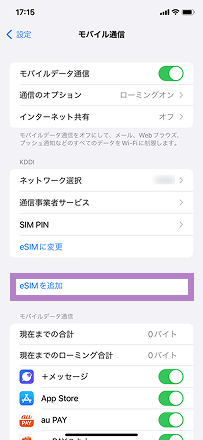
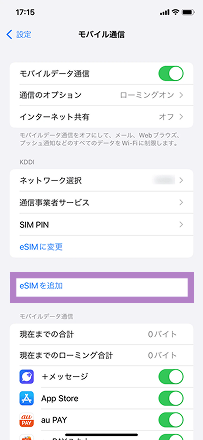
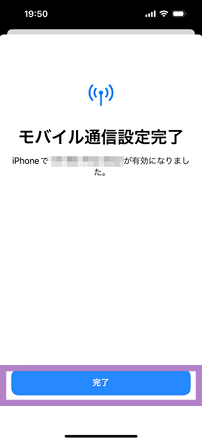
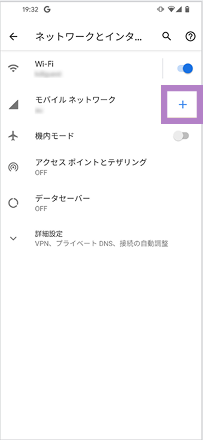
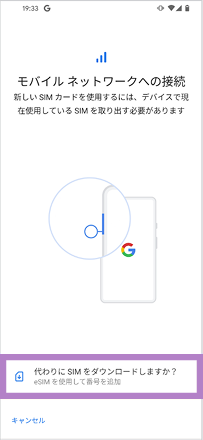
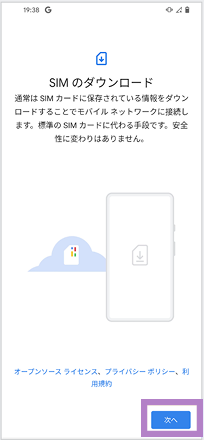
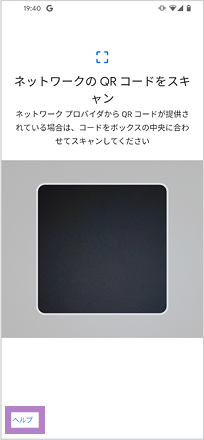
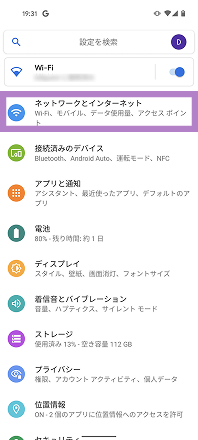
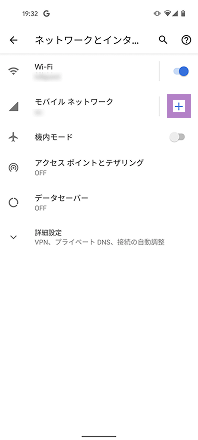
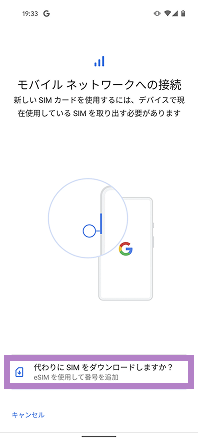
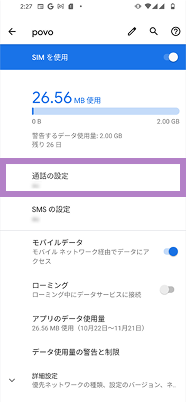
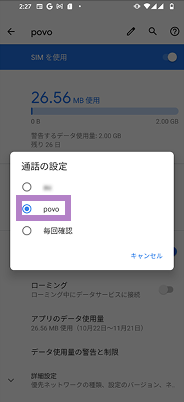
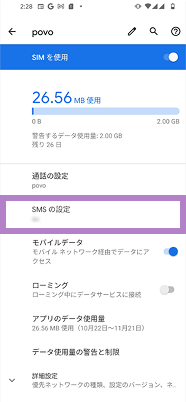
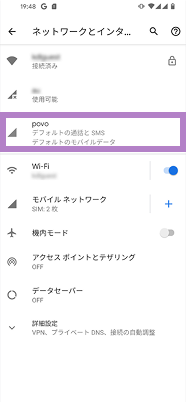
Follow the steps below to set your mobile network to povo.
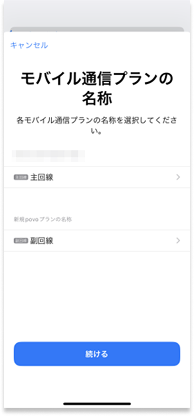
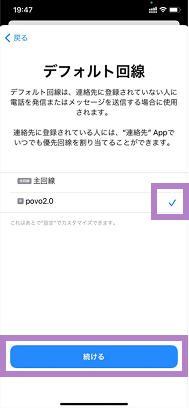
*If you change from a SIM card to an eSIM, please remove the SIM card you were using. *If you are using an iPad, STEP 4-8 "Default voice line" will not be displayed.
[ procedure ]

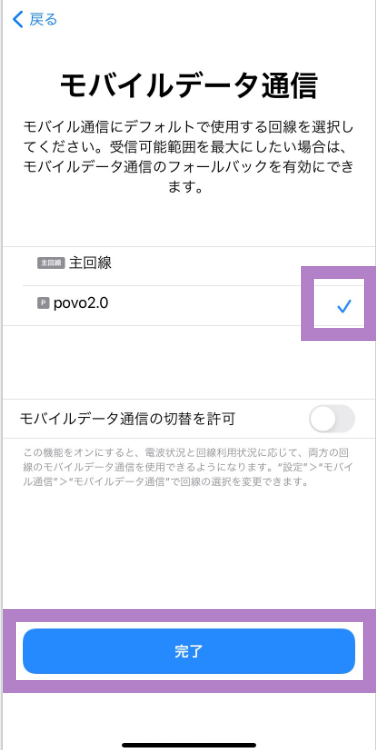

*You can check your contracted phone number by tapping the person icon in the upper left corner of the app home screen and going to your profile. You cannot check your phone number on the device settings screen.
Follow the steps below to set your mobile network to povo.
[ procedure ]


1. Please check the iOS version of the device you are using povo2.0 on.
[How to check iOS]
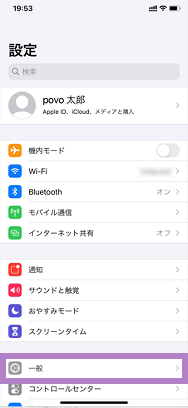
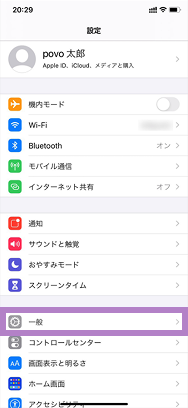
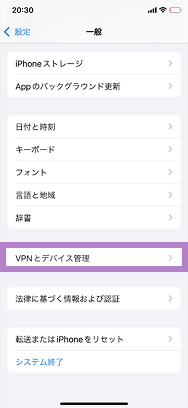
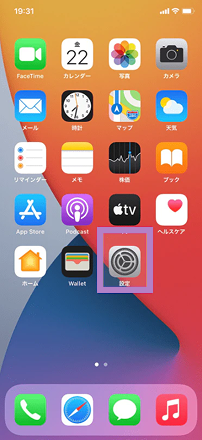
Please check that the system version is 15.0 or higher in [Settings] > [General] > [About].
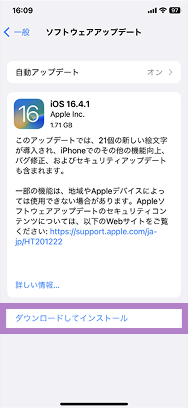
2. If your iOS version is lower than 15.0, please update to the latest version of iOS.
[How to update the OS on iPhone/iPad]
*If you are unable to update the OS on your iPhone, tap here on your povo device to download the APN setting profile and complete the APN setting installation.
[How to install APN settings on iPad]
To use povo2.0 on an iPad with iPadOS version earlier than 17.1, you must install the APN settings.
Customers who have set an APN setting profile other than povo
If you have set up an APN setting profile before subscribing to povo2.0, please follow the steps below to delete it.
Please set the APN for povo2.0 and select it.
* In most cases, APN settings are required for Android smartphones purchased from au. * If "4G" or "5G" is displayed next to the signal icon, or if data communication is possible with Wi-Fi turned off, this setting is not necessary.
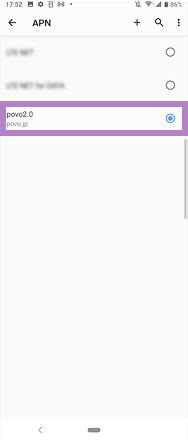
[Procedure (example for Xperia)]
*Item names may be displayed differently depending on the model. Please refer to the instruction manual for instructions on how to set the APN (Access Point Name).

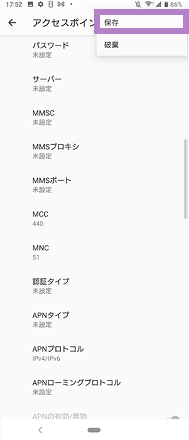
Items to be entered
[name]
povo2.0
[APN]
povo
[APN Protocol]
IPv4 / IPv6
If you are currently using povo2.0 with an eSIM and plan to continue using the eSIM after changing your phone model, please see below. Also, if you are using an iPhone 8 or later, we have listed a simple method for changing your phone model (eSIM quick transfer), so please check here.
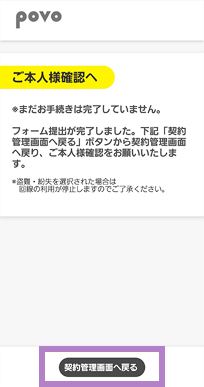
After changing your device, connect it to Wi-Fi, log in to the povo2.0 app, and carry out the procedure to reissue the eSIM. [Procedure]
*We do not accept SIM reissue or exchange requests between 8:00 PM and 9:30 AM.
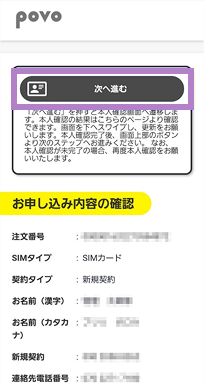
Activate (issue) the eSIM
[ procedure ]
*Please activate your SIM between 9:30 and 20:00. For more information, please click here.
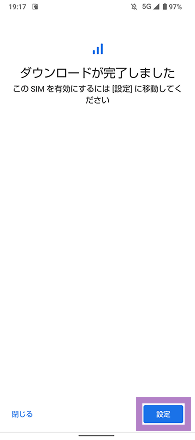
Please be sure to do this on the new device.
*Downloading the eSIM may take some time.
The "Download eSIM profile" button is only available for version 1.24.0 or later of the povo2.0 app. If you are using version 1.23.0 or earlier, or if you are using the 1.24.0 app and are unable to download by tapping the button, please follow the steps here for "If you are using one eSIM device (code entry method)" or "If you have multiple devices (QR code method)."
*To move to the screen in STEP 3-1 after transitioning to the home screen, tap "Profile Page" > "Contract Management" in the upper left of the home screen. *Even if you transition to the home screen, please make sure to check the call test and mobile data communication test before purchasing Topping.
[When using one eSIM device (code entry method)]
*You do not need to enter a "verification code." *For iPads, select Settings > Mobile Data > Add New Plan > Other... to proceed to the screen for selecting a mobile data plan. *If you are unable to complete the eSIM setup, it may be that the code was not copied properly. Please double-check that you have copied all the alphanumeric characters and try again. If this still does not work, try the "QR code method" below. *To proceed to the screen in STEP 3-1 after returning to the home screen, go to the person icon in the upper left corner of the home screen > Contract Management.
[For those with multiple devices (QR code method)]
*For iPad, select Settings > Mobile Data > Add New Plan > Other... to go to the screen for selecting a mobile data plan. *Even if you are redirected to the home screen, please make sure to check the call test and mobile data test in STEP 06 before purchasing Topping.
Please be sure to do this on the new device.
*Downloading the eSIM may take some time.
The "Download eSIM profile" button is only available for version 1.24.0 or later of the povo2.0 app. If you are using version 1.23.0 or earlier, or if you are using the 1.24.0 app and are unable to download by tapping the button, please follow the steps here for "If you are using one eSIM device (code entry method)" or "If you have multiple devices (QR code method)."
[When using one eSIM device (code entry method)]
*If you are unable to complete the eSIM setup, it may be that the code was not copied properly. Please double-check that you have copied all the alphanumeric characters and try again. If this still does not work, please use the "QR code method" below. *To return to the screen in STEP 3-1 after returning to the home screen, go to the person icon in the upper left corner of the home screen > Contract Management.
[For those with multiple devices (QR code method)]
*Please purchase Topping only after checking the call test and mobile data communication test in STEP 06.
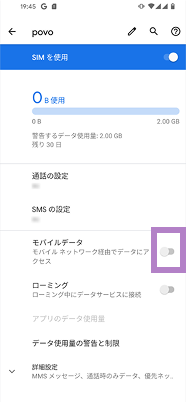
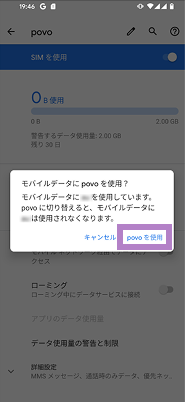
Follow the steps below to set your mobile network to povo.
*If you are using an iPad, STEP 4-8 "Default voice line" will not be displayed.
[ procedure ]
*You can check your contracted phone number by tapping the person icon in the upper left corner of the app home screen and going to your profile. You cannot check your phone number on the device settings screen.
Follow the steps below to set your mobile network to povo.
[ procedure ]
1. Please check the iOS version of the device you are using povo2.0 on.
[How to check iOS]
Please check that the system version is 15.0 or higher in [Settings] > [General] > [About].
2. If your iOS version is lower than 15.0, please update to the latest version of iOS.
[How to update the OS on iPhone/iPad]
*If you are unable to update the OS on your iPhone, tap here on your povo device to download the APN setting profile and complete the APN setting installation.
[How to install APN settings on iPad]
To use povo2.0 on an iPad with iPadOS version earlier than 17.1, you must install the APN settings.
Customers who have set an APN setting profile other than povo
If you have set up an APN setting profile before subscribing to povo2.0, please follow the steps below to delete it.
Please set the APN for povo2.0 and select it.
* In most cases, APN settings are required for Android smartphones purchased from au. * If "4G" or "5G" is displayed next to the signal icon, or if data communication is possible with Wi-Fi turned off, this setting is not necessary.
[Procedure (example for Xperia)]
*Item names may be displayed differently depending on the model. Please refer to the instruction manual for instructions on how to set the APN (Access Point Name).
Items to be entered
[name]
povo2.0
[APN]
povo
[APN Protocol]
IPv4 / IPv6
If you are currently using povo2.0 with an eSIM and would like to use a SIM card after changing your model, please check the following.
(If you have changed your phone model and the SIM card size no longer fits, please see here.)
Complete the procedure to change from eSIM to SIM card on your previous device
[ procedure ]
*If you are unable to use your previous device, connect your new device to Wi-Fi, download the povo2.0 app, and follow these steps. *We do not accept SIM reissue or exchange requests between 8:00 PM and 9:30 AM.
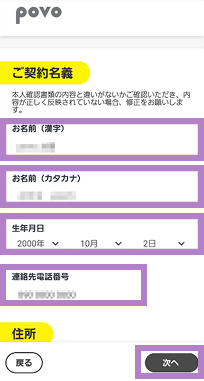
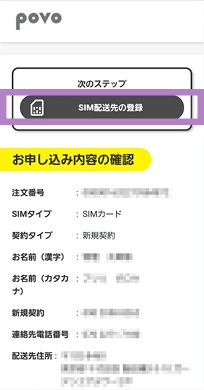
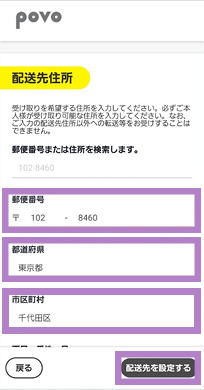
Follow the steps below to set the delivery address for your SIM card.
[ procedure ]
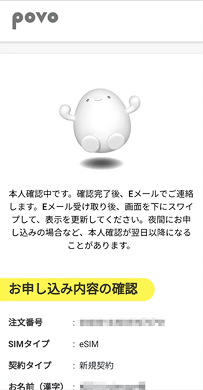
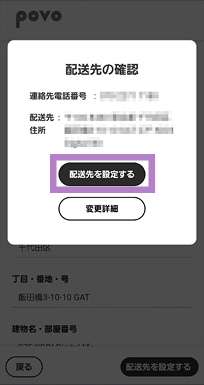
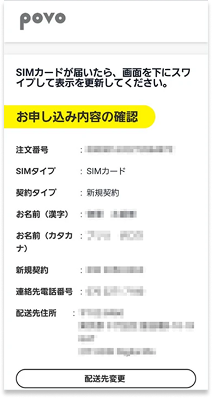
After signing the contract, you will receive the SIM card by mail.
Activate your SIM card
[ procedure ]
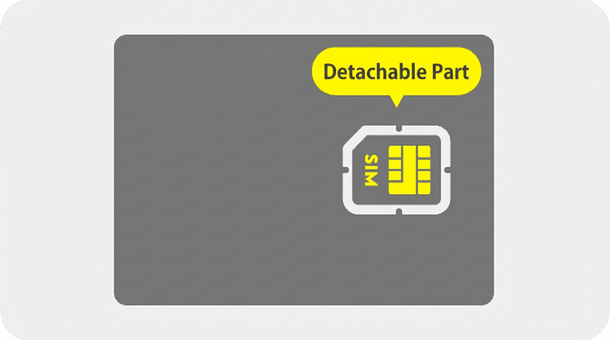
*Please refer to the instruction manual for your mobile phone for installation instructions. * povo2.0 SIM cards are compatible with Nano, Micro, and Mini sizes.
1. Please check the iOS version of the device you are using povo2.0 on.
[How to check iOS]
Please check that the system version is 15.0 or higher in [Settings] > [General] > [About].
2. If your iOS version is lower than 15.0, please update to the latest version of iOS.
[How to update the OS on iPhone/iPad]
*If you are unable to update the OS on your iPhone, tap here on your povo device to download the APN setting profile and complete the APN setting installation.
[How to install APN settings on iPad]
To use povo2.0 on an iPad with iPadOS version earlier than 17.1, you must install the APN settings.
Customers who have set an APN setting profile other than povo
If you have set up an APN setting profile before subscribing to povo2.0, please follow the steps below to delete it.
Please set the APN for povo2.0 and select it.
* In most cases, APN settings are required for Android smartphones purchased from au. * If "4G" or "5G" is displayed next to the signal icon, or if data communication is possible with Wi-Fi turned off, this setting is not necessary.
[Procedure (example for Xperia)]
*Item names may be displayed differently depending on the model. Please refer to the instruction manual for instructions on how to set the APN (Access Point Name).
Items to be entered
[name]
povo2.0
[APN]
povo
[APN Protocol]
IPv4 / IPv6
Please call the test number "111" (toll free), listen to the guidance to the end, and then hang up.
*Not required for iPad.
With Wi-Fi turned off, launch your browser and check whether you can access websites using mobile data.
*Before purchasing data Topping, it may take some time for the screen to display, but as long as the screen can be displayed, there is no problem.
Once the call test and mobile data communication test are complete, the activation procedure is complete.
Please purchase Topping and continue using povo2.0.
*If you are unable to communicate even after completing all settings, please check the following.
 Prepare the device
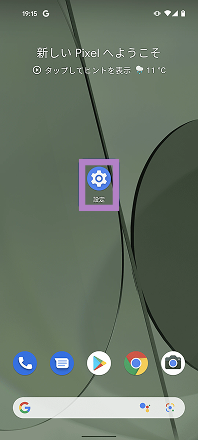
 Advance preparation
 Initial Setup
 Calling test


