If you're an iPhone user, you've probably seen the name "AirDrop" at least once. However, even if you know the name, there are still many people who don't know how to use it or what its functions actually are.
This article provides a clear explanation of how to use AirDrop and what to be careful about for those who have questions about it.
AirDrop is a feature that allows you to share files, photos, videos, and other data directly between Apple devices such as iPhones, iPads, and Macs. It does not require cables or an internet connection, and allows you to instantly exchange data with people you do not know.
Specific examples of use include being able to instantly share memorable photos and videos taken while out with friends, information about shops that caught your eye while you were out, or sending recommended web pages or app links to your friends.
Traditionally, when sending large amounts of data such as photos or videos, users would use email or messaging apps like LINE. However, using email or messaging apps comes with the disadvantage of running the risk of reaching your data limit. Furthermore, image data may be automatically reduced or compressed. Furthermore, when connecting with new friends or acquaintances, you first need to exchange contact information, which can be a hassle.
The appeal of AirDrop is that it solves these problems. Because it doesn't require an internet connection, you can share files easily without worrying about data usage or image data reduction or compression. What's more, you can even exchange data with people you don't know their contact details.
AirDrop is a feature that can be used with products running Apple iOS or Mac OS. Please note that it is not compatible with Android devices.

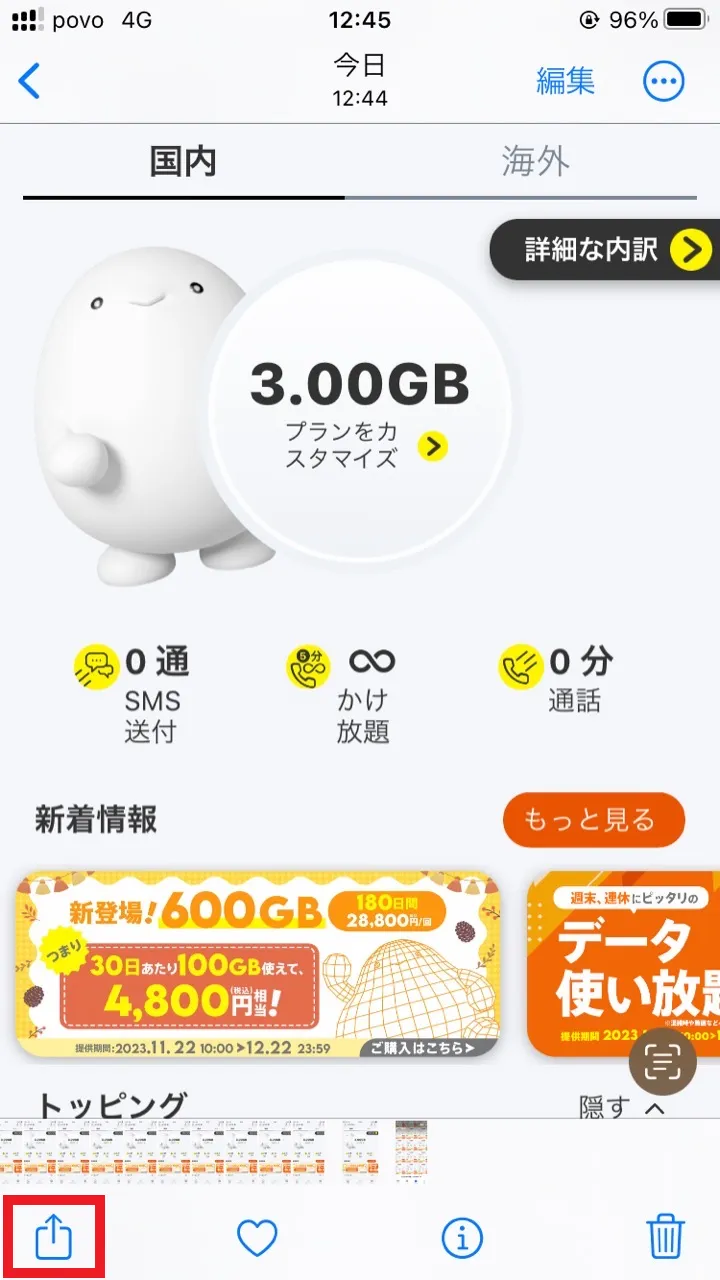
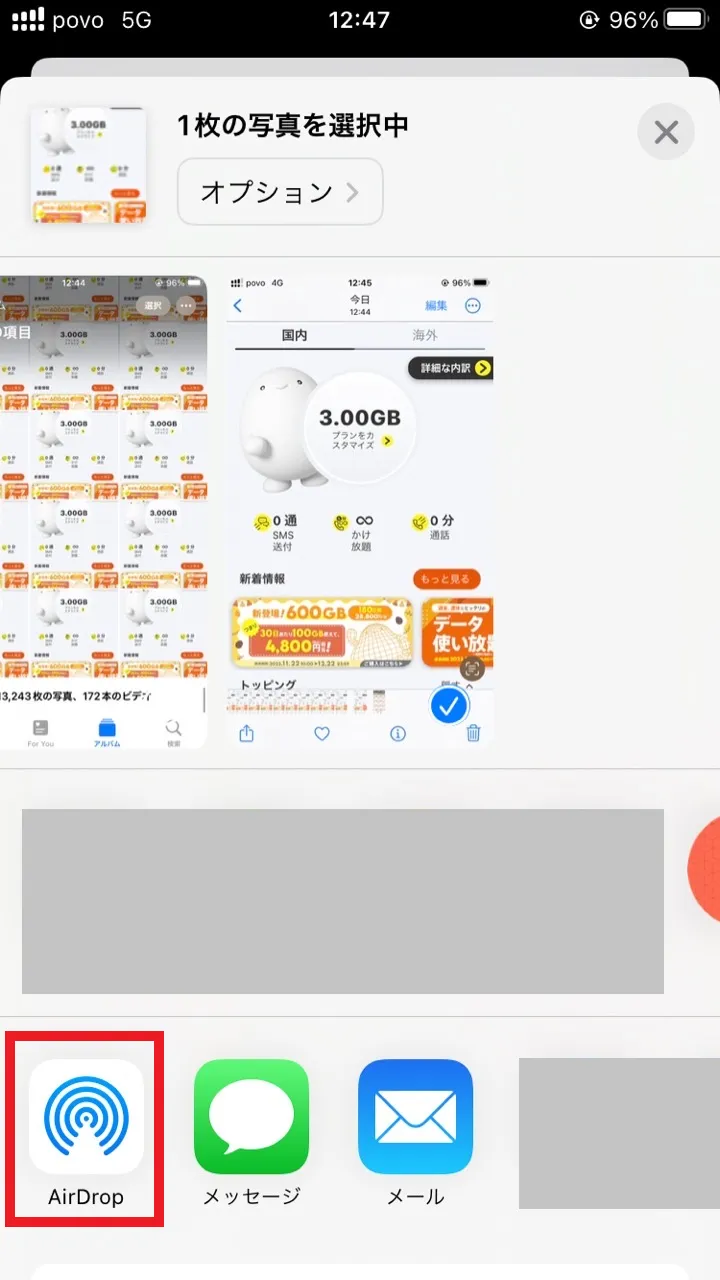
This article explains how to use AirDrop on your iPhone to exchange data (in this case, images and videos). The procedure may vary slightly depending on your iPhone model and iOS version.
The above method also applies to sharing other data such as web pages, app links, location information, contacts, etc.
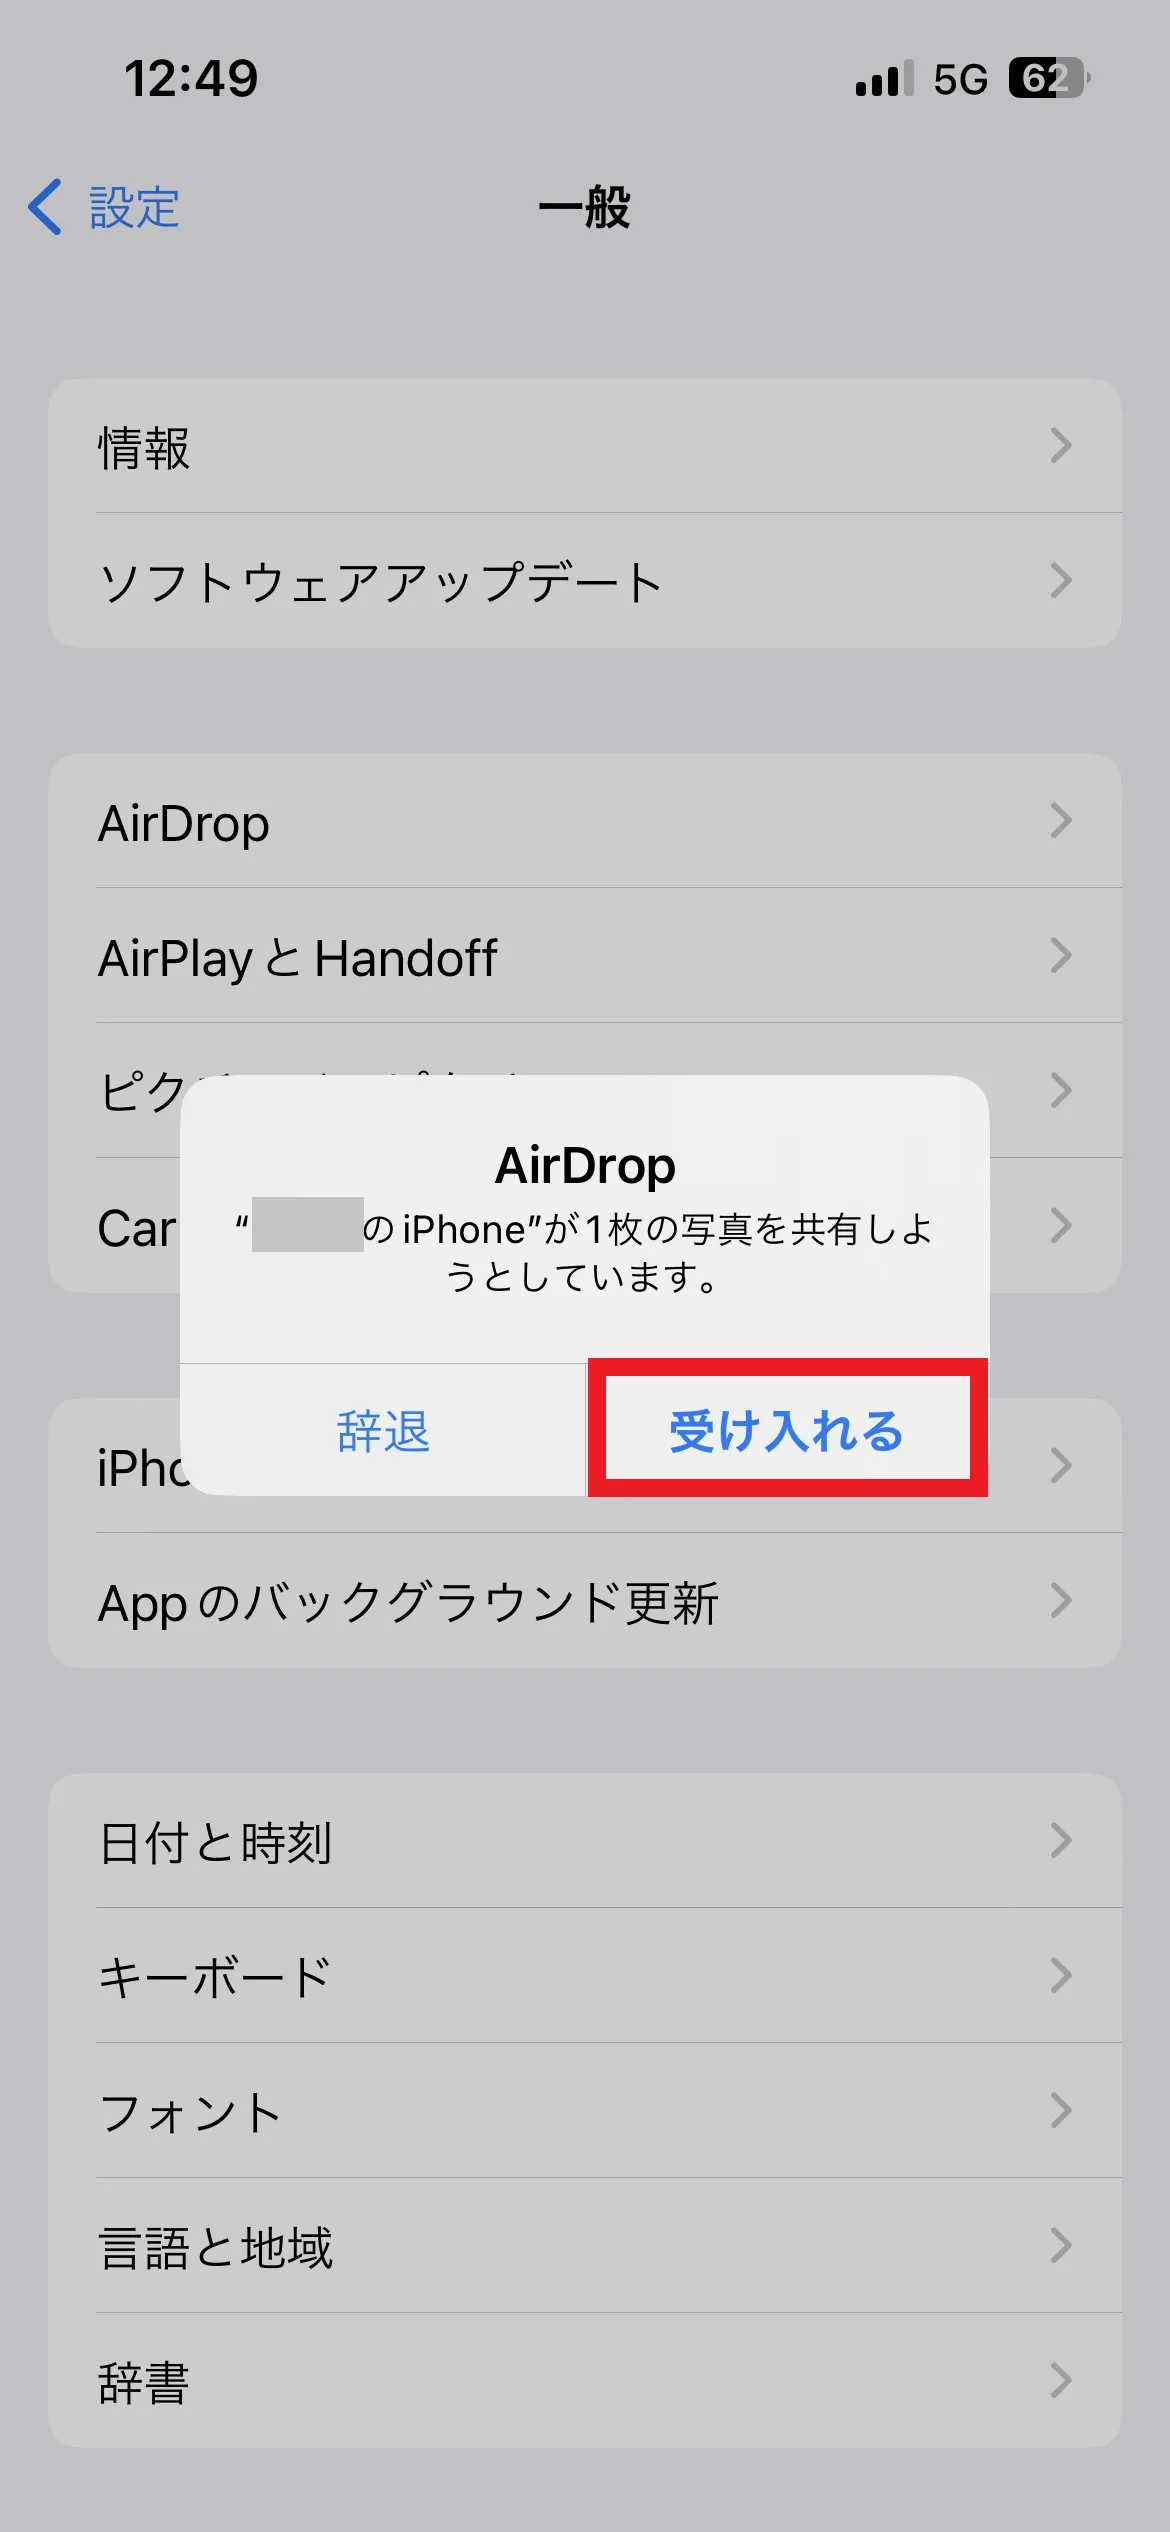
The receiving side operates as follows:

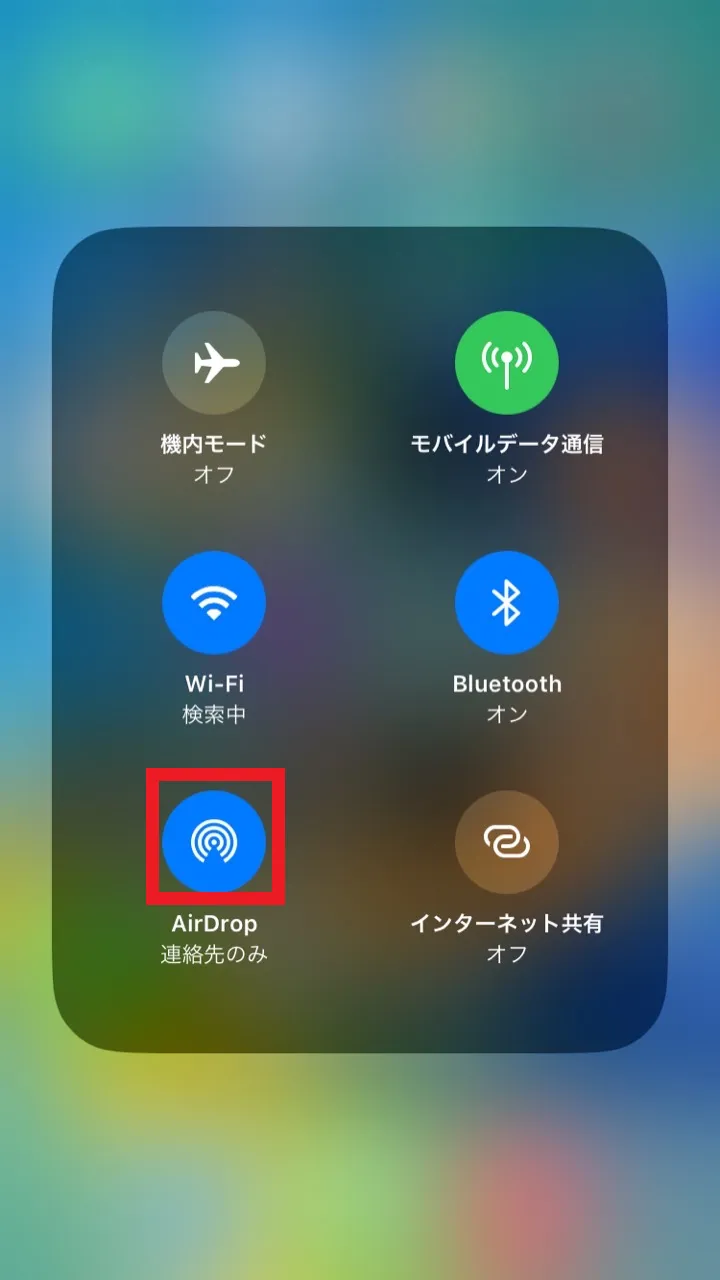
To use AirDrop, you need to check the settings as follows. Here we will explain the steps to set up AirDrop.
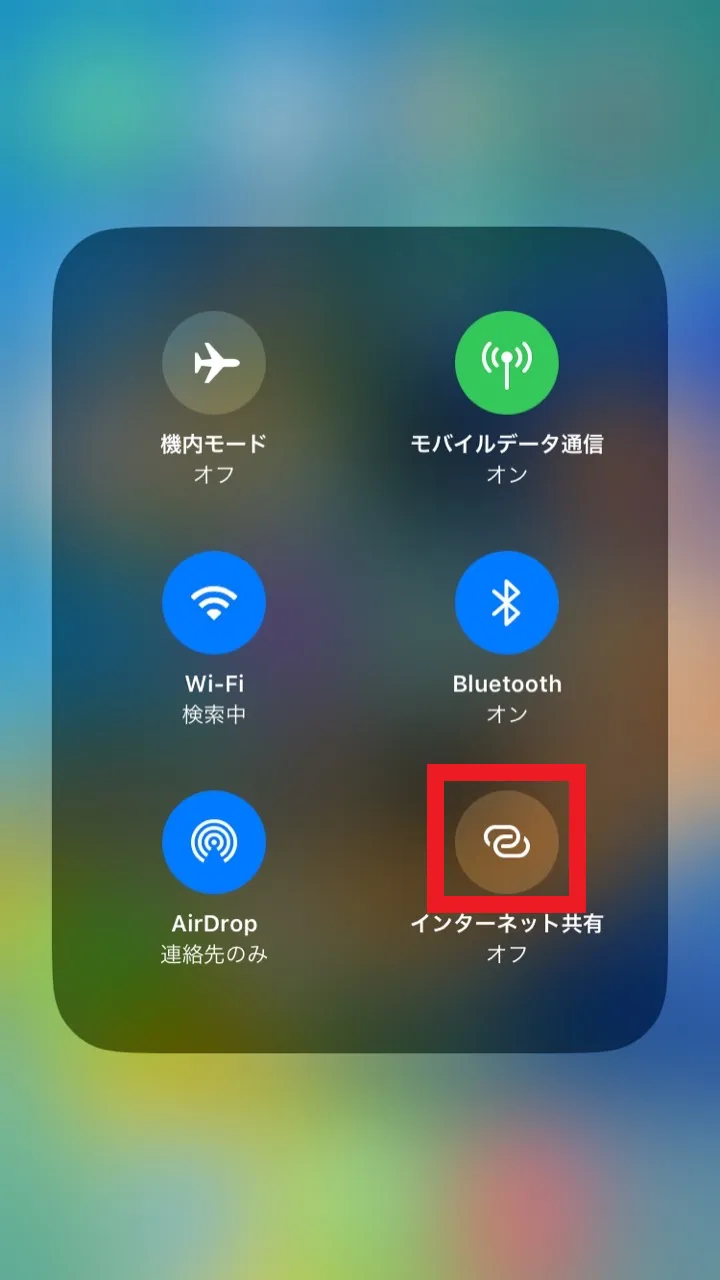
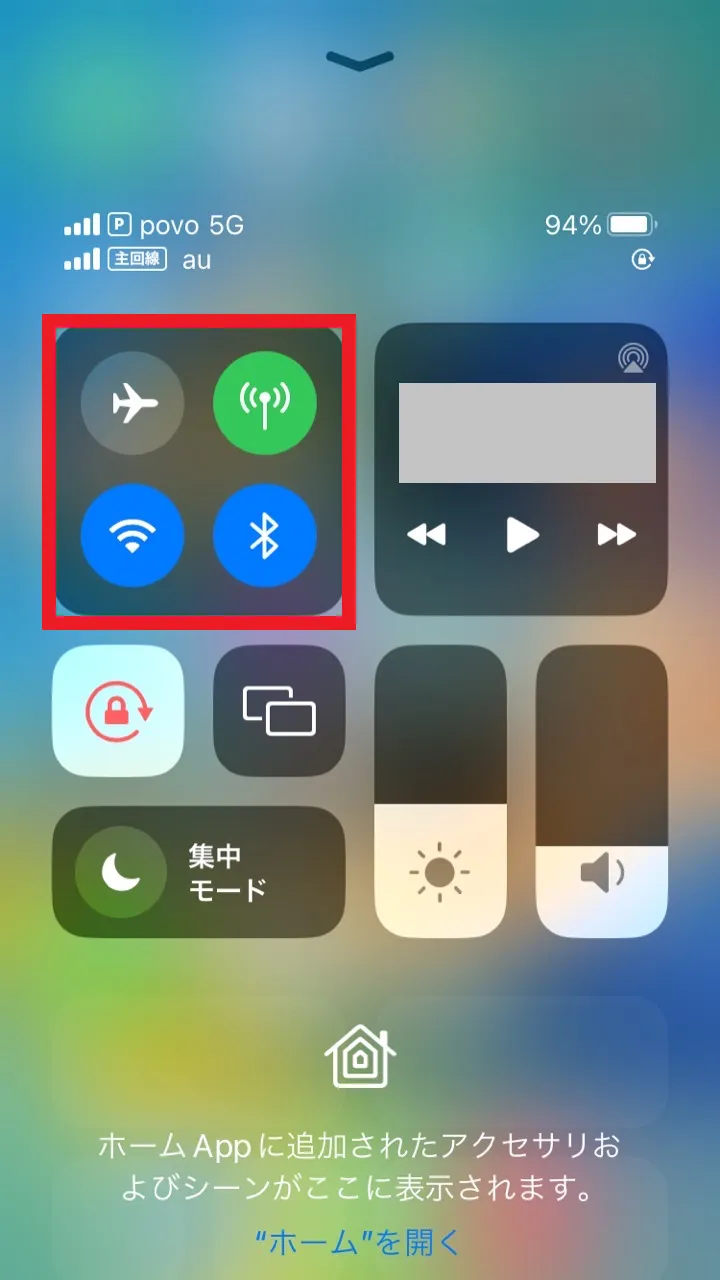
・Enable Wi-Fi and Bluetooth
・Turn off Internet Sharing
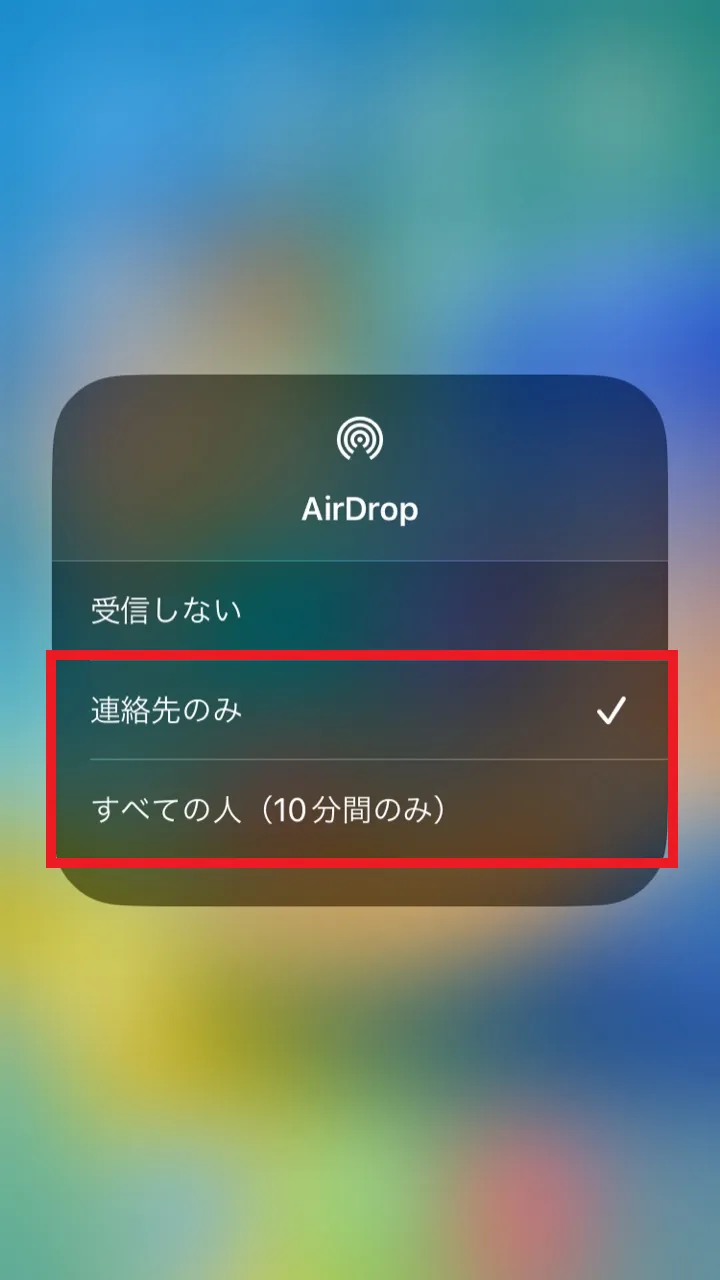
・Set your AirDrop receiving settings to "Contacts only" or "Everyone"
AirDrop exchanges data via Wi-Fi and Bluetooth. Therefore, both the sender and the receiver must have both features enabled. You can enable Wi-Fi and Bluetooth by changing the settings in the Control Center.
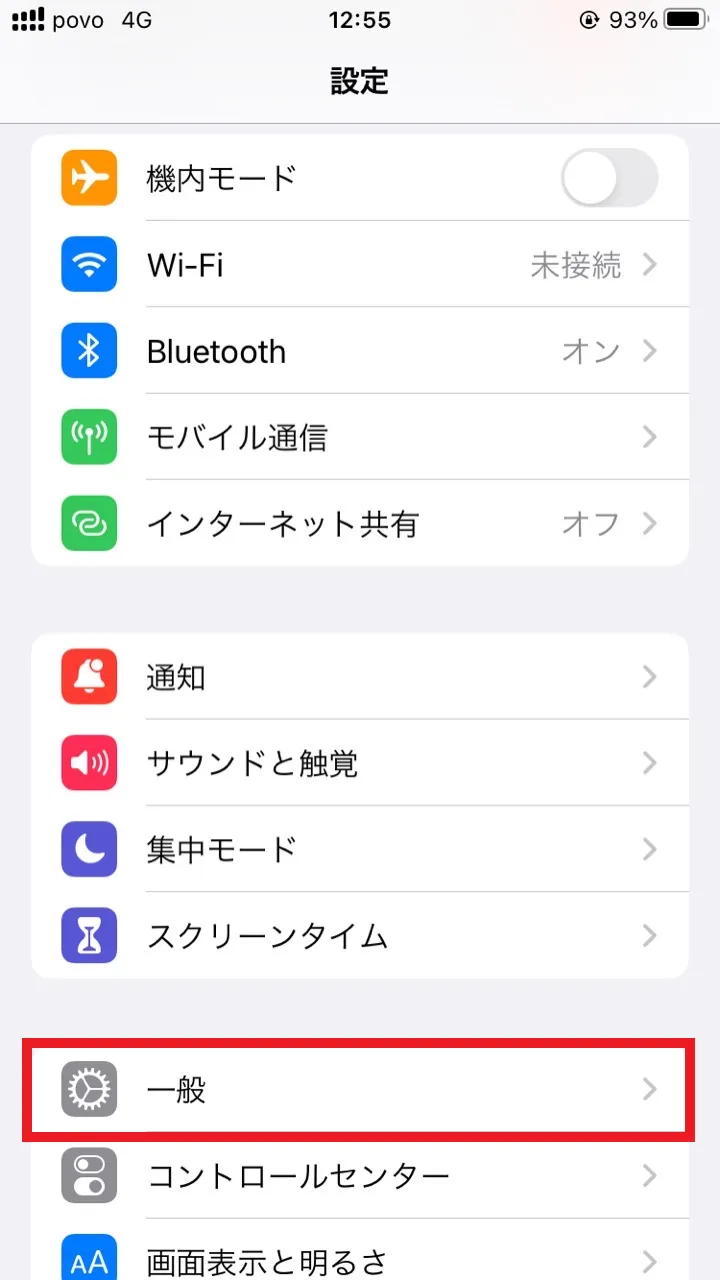
How to open the Control Center.
For iPhone X and later: Swipe down from the top right of the screen
For iPhone SE, iPhone 8 and earlier: Swipe up from the bottom of the screen
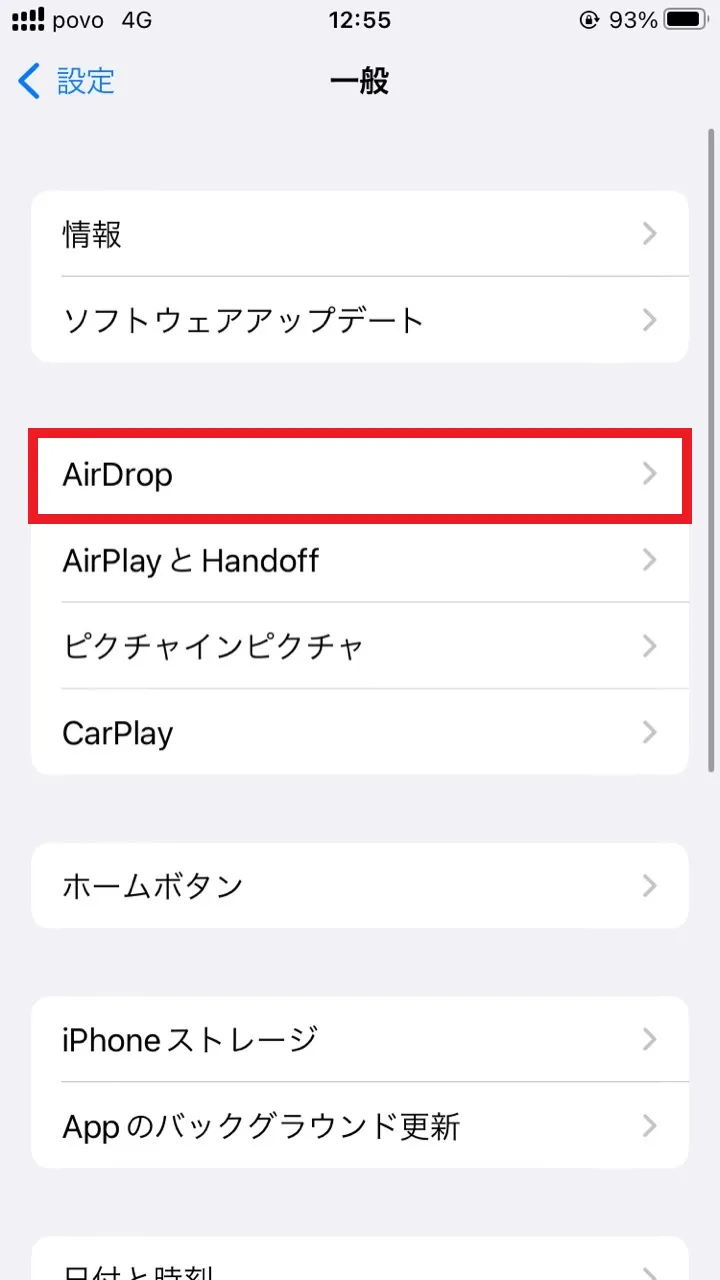
If you don't know how to open it, go to "Settings" -> "General"
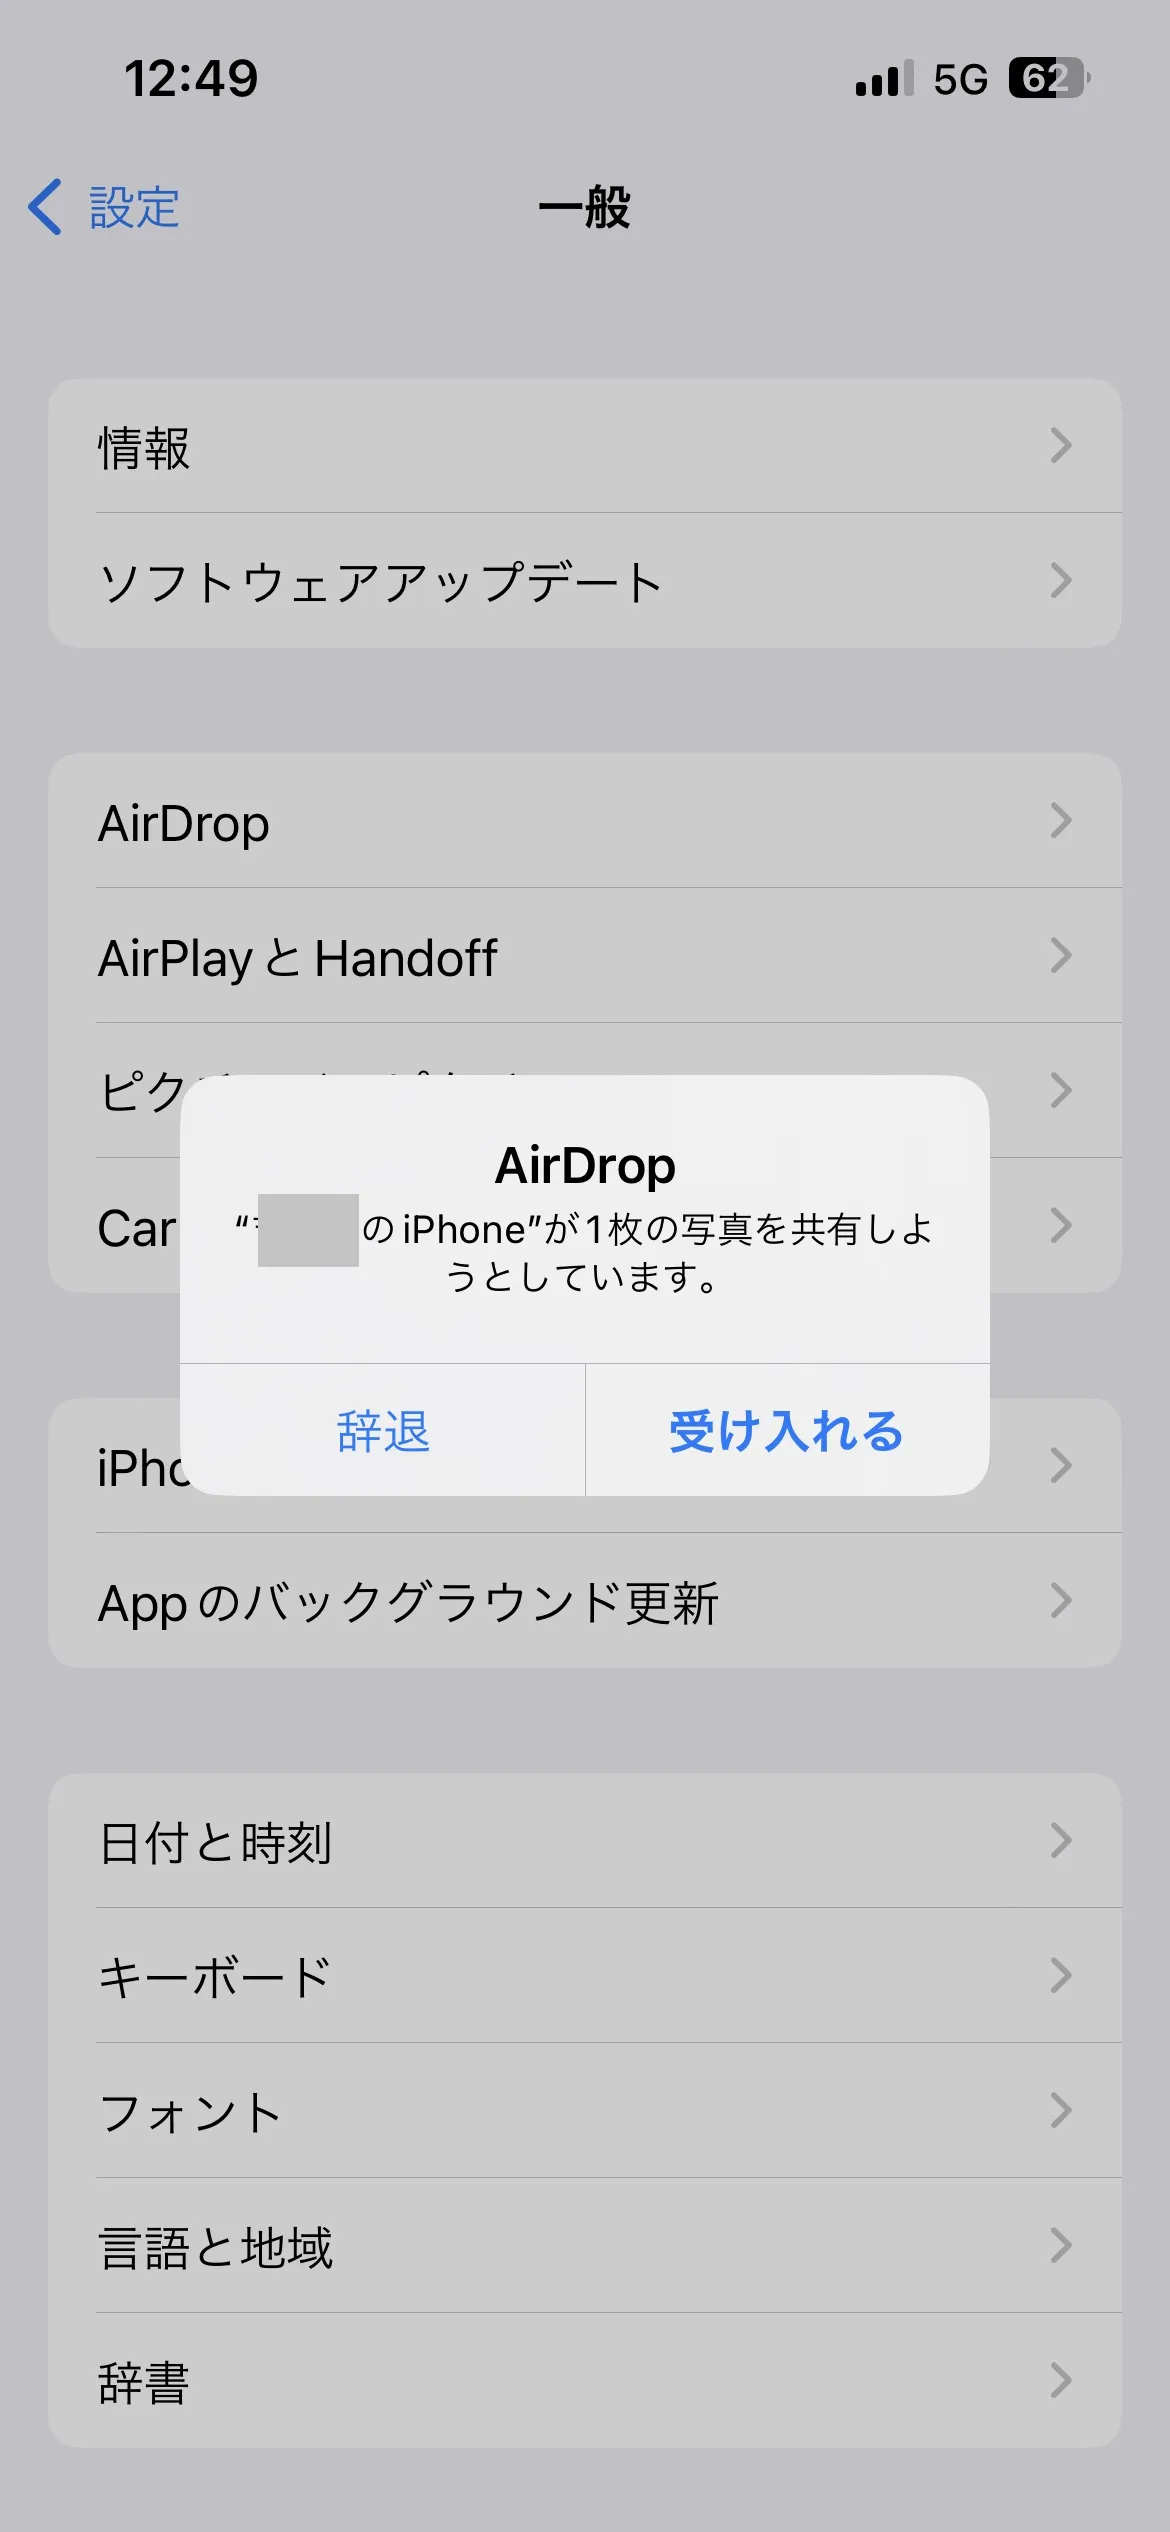
To change the receiving settings, use AirDrop from the Control Center or Settings. If the receiving setting is set to "Don't receive," you will not be able to receive data.


There are cases when AirDrop doesn't work as expected when you try to use it. If you have problems sharing data or connecting, check your device's settings and whether it's compatible. Here we'll explain what to do if you can't use AirDrop and what to be aware of.
If you're having trouble sharing data or connecting, try checking the following settings:
・AirDrop settings
・Wi-Fi and Bluetooth settings
・Login status to iCloud
・Size of data to be transferred
・Is the distance between the devices too far?
If the sender's iPhone does not display the recipient's name, it is likely that the recipient's settings are set to "Don't receive" or "Contacts only." If you have mutual contacts, have the recipient change the setting to "Contacts only." If you do not know the recipient's contact information, have them change the setting to "Everyone."
If you still can't see the recipient after changing the settings, make sure your Wi-Fi and Bluetooth are properly turned on. Both Wi-Fi and Bluetooth must be enabled to use AirDrop.
To use AirDrop, both devices must be logged in to iCloud. If you are not logged in, please log in.
If the recipient's iPhone does not have enough storage space, the data will not be received. If the data size is large, consider compressing or splitting it.
To connect devices, they must be within a distance where Bluetooth can communicate. If the devices are far apart or there are obstacles between them, they will not appear as sharing options. Make sure they are within the appropriate distance.
AirDrop is available on many Apple products, but older models may not be compatible. It also doesn't work on Android devices. If it doesn't work, check to see if your device is compatible.
The following conditions must be met for devices to be AirDrop compatible:
To use AirDrop, you need an iPhone or iPad (including iPadOS) with iOS 7 or later installed. Compatible models include iPhone 5 and later, iPad 4th generation and later, iPad mini, iPad Air, and iPad Pro.
To use AirDrop between an iPhone and a Mac, you need a 2012 or later Mac running OS X Yosemite or later (the Mid-2012 Mac Pro is not supported). If you're sharing data between Macs, AirDrop can be used on models older than 2012.
iPhone: iOS 7 or later
iPad: iOS 7 or later (compatible with all generations of iPad mini, iPad Air, and iPad Pro)
iPod...5th generation (iPod touch) and later
Mac: A Mac with OS X Yosemite or later installed (Mac Pro is supported)

AirDrop can share a variety of data other than photos and videos. Here we will introduce the data that can be shared with AirDrop.
You can easily share documents and PDF files. For example, this is useful if you want to view a PDF document created on a Mac in the office on your iPhone or iPad while on the go.
You can also easily share your location information. For example, it is useful when you want to tell a friend about a location you searched for using a map app such as Google Maps.
You can easily share your contacts or any other contacts you have saved on your device.
AirDrop also lets you share web pages, so you can instantly share interesting web pages and information.
You can easily share apps you like or use.
In this article, we have compared the recommended models in the AQUOS series and explained the latest models. When purchasing an AQUOS, why not also take a look at your communication fees? If you are concerned about communication fees, try au 's advantageous online-only brand "povo2.0" (※4) We recommend the following.
povo2.0 is a system that allows you to purchase only the amount of data you need. The monthly basic fees is 0 yen. (※5)(※6)(※7) For example, if you want to enjoy watching YouTube without worrying about data usage, you can Topping" Unlimited data (24 hours) 330 yen/time tax included included)". (※8) We also recommend the large-capacity Topping" Data Top-up (180 days) for 12,980 yen per use tax included)."
If you want to get the best deal on AQUOS, why not try povo2.0?
*4: This is an online-only plan, so all procedures and support are online. povo2.0 Please contact us through the application or the official website. 5:Additional fees such as handling charges may apply. validity for 180 days or more, or if you have never purchased a paid Topping subscription, your usage may be suspended or your contract terminated. Please understand this in advance.
If you subscribe to 5 lines(*) under the same name, a contract administration fee of tax included 3,850 yen/line will be charged for the 6th line and thereafter.
*5: Including lines that have been terminated or cancelled by the Company within the past year. 6:Domestic calls are charged separately at tax included 22 yen/30 seconds, and SMS sending is charged separately at tax included 3.3 yen/text (up to 70 characters). Depending on the model, up to 670 two-byte characters can be sent; up to 134 characters are counted as two SMS messages, and thereafter one SMS message is charged for each 67 characters. Call charges may differ for some calls, such as calls to satellite phones. *7: When 0 yen and 0 GB, the maximum sending/receiving speed is 128 kbps. *8: Communication speed may be limited during network congestion or when using videos, cloud games, etc.