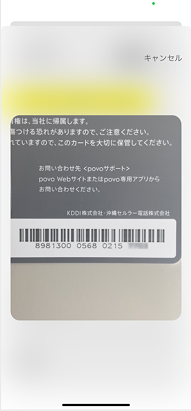
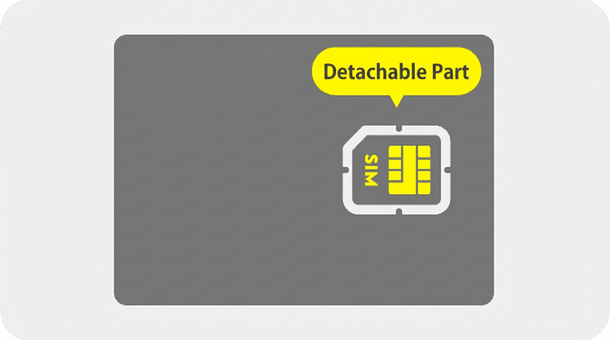
A SIM is an IC card that records the subscriber's identification number and telephone number required for data communication and calls.
An eSIM is a SIM that is built into the device. Unlike a SIM card, it is embedded in the smartphone beforehand, so there is no risk of losing the SIM itself.
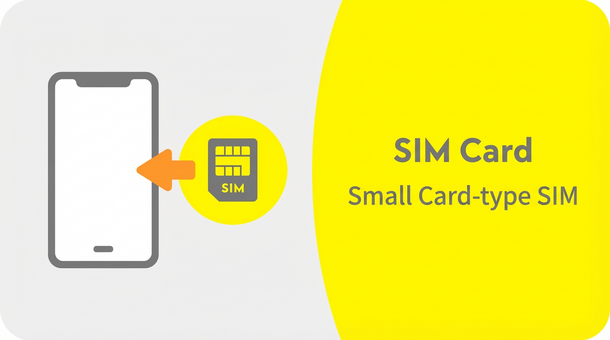
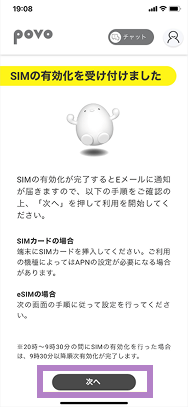
It is a small card-type SIM that you insert into your device and use. When you use it, it will be delivered to your home by mail.
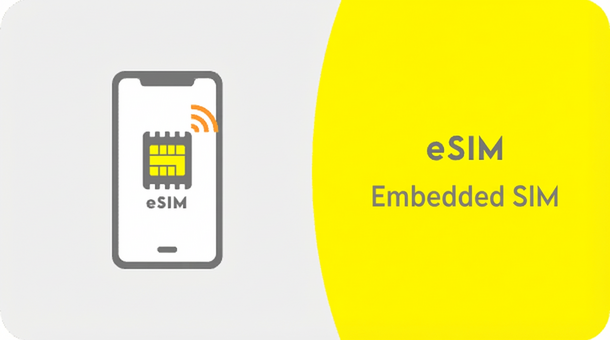
An eSIM is an embedded SIM that uses downloaded data called a profile.

A SIM-free or unlocked device is required.
Devices purchased from au do not require SIM unlocking.

Delivered by mail
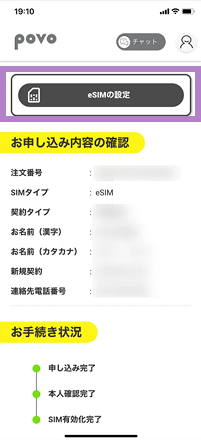
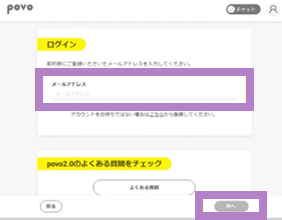
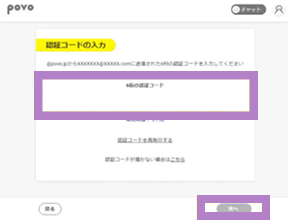
Procedure
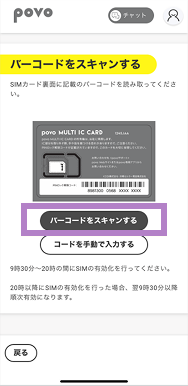
*Please refer to the instruction manual for your mobile phone for installation instructions. * povo2.0 SIM cards are compatible with Nano, Micro, and Mini sizes.
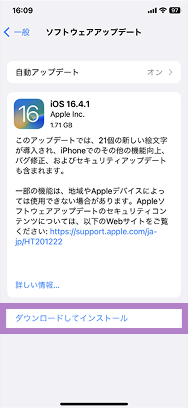
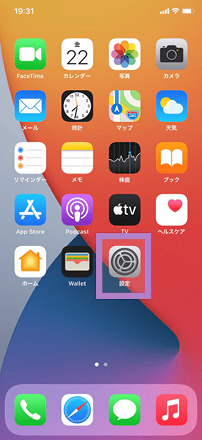
To use povo2.0, you must update to the latest OS.
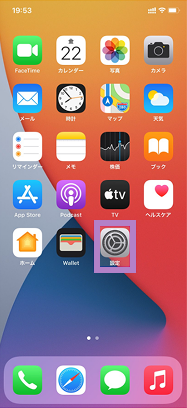
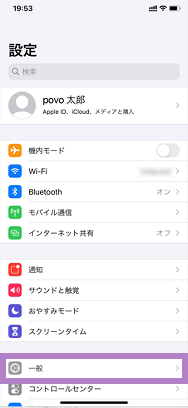
Please follow the steps below to update your OS.
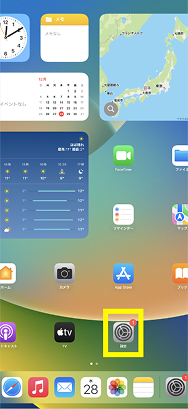
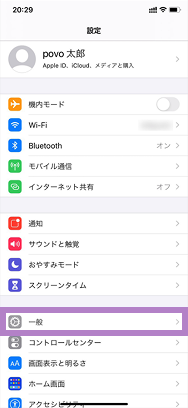
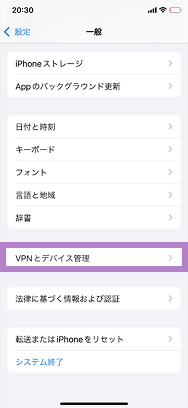
How to update the OS on your iPhone or iPad

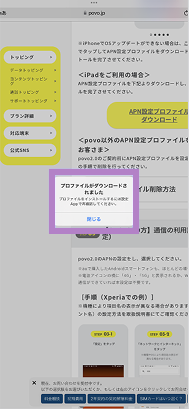
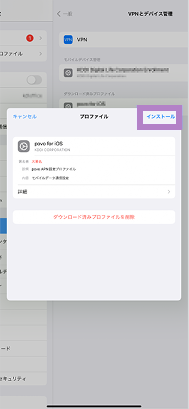
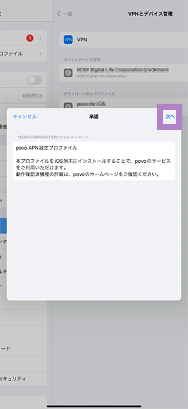
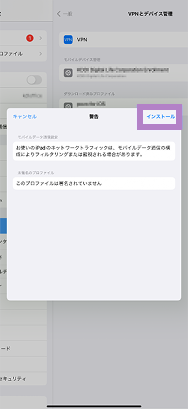
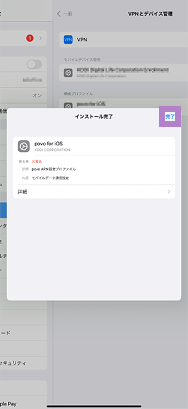
APN setting installation procedure (for iPad)
To use povo2.0 on an iPad with iPadOS version earlier than 17.1, you must install the APN settings.


Customers who have configured APN settings
for services other than povo
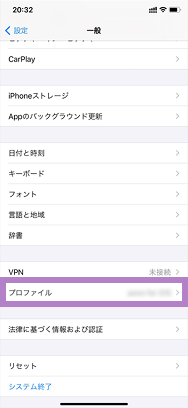
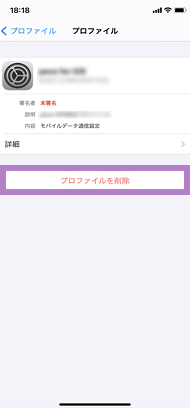
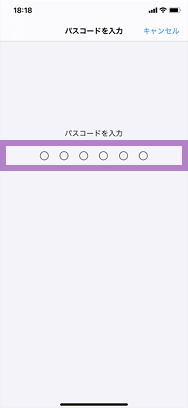
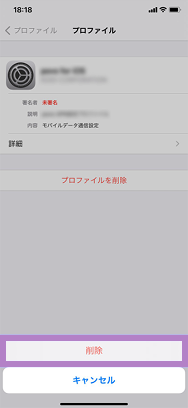
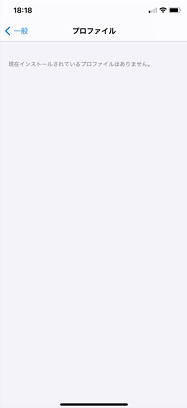
If you have set up an APN setting profile before subscribing to povo2.0, please follow the steps below to delete it.


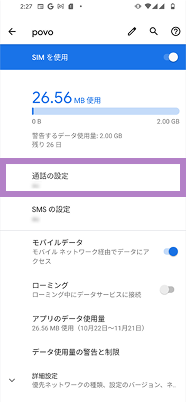
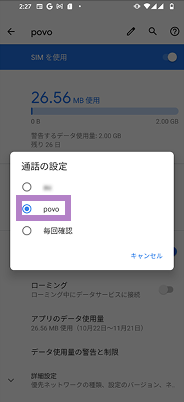
Please call the test number (111/toll-free), listen to the guidance to the end, and then hang up.
*Not necessary for iPad. *The test number (111) cannot be used from outside Japan.
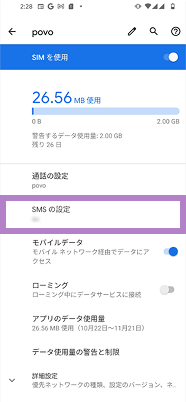
With Wi-Fi turned off, open your browser and check whether you can access the website (https:// povo.jp) using mobile data.
* Before purchasing data Topping, it may take some time for the screen to display, but as long as the screen is displayed, there is no problem. * To access from outside Japan, you will need to purchase "Overseas data Topping."
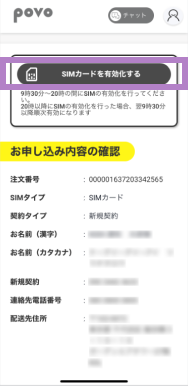
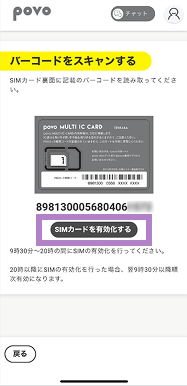
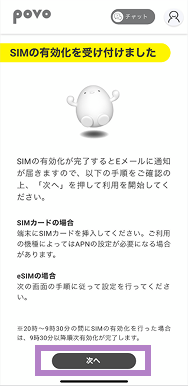
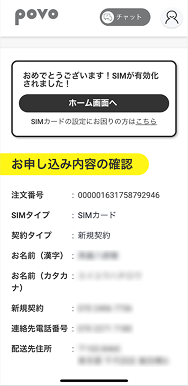
Once the call test and mobile data communication test are complete, the SIM card activation procedure is complete.
Purchase your Topping and enjoy the world of povo!
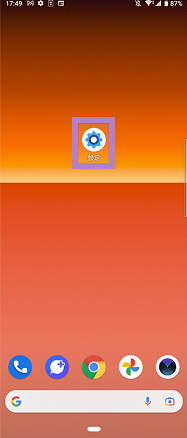
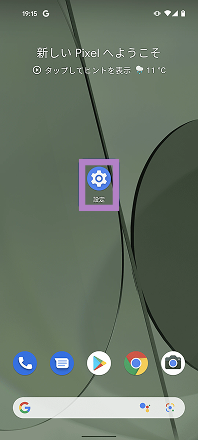
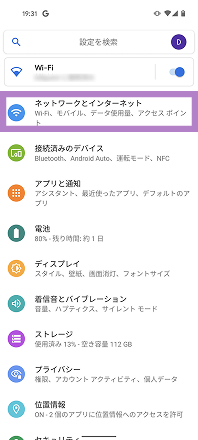
The activation procedure for Android varies depending on the model. Please select your model from the list below.
Procedure
*Please refer to the instruction manual for your mobile phone for installation instructions. * povo2.0 SIM cards are compatible with Nano, Micro, and Mini sizes.
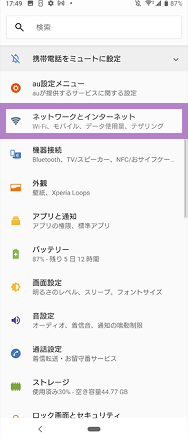
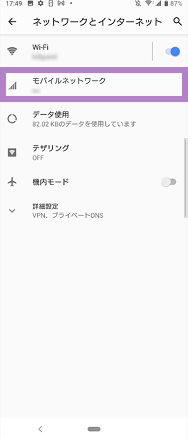
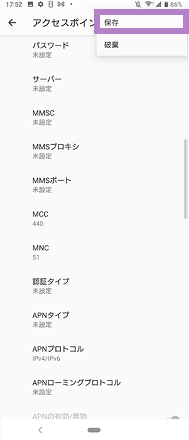
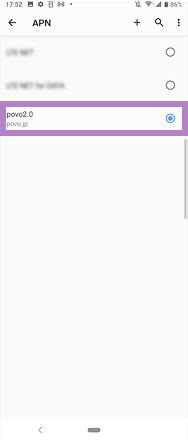
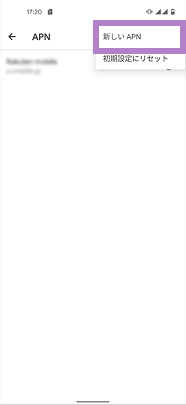
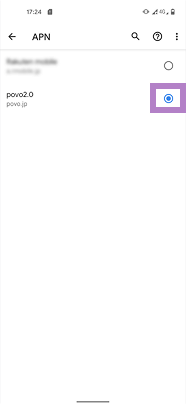
Please set the APN for povo2.0 and select it.
* In most cases, APN settings are required for Android smartphones purchased from au. * If "4G" or "5G" is displayed next to the signal icon, or if data communication is possible with Wi-Fi turned off, this setting is not necessary.
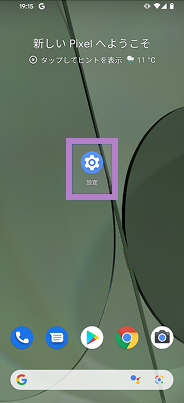
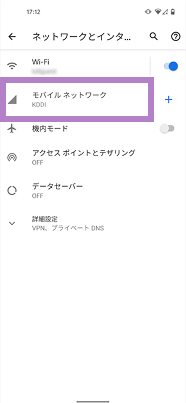
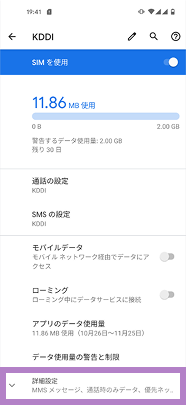
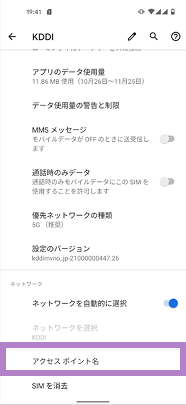
Procedure (Xperia example)
*Item names may be displayed differently depending on the model. Please refer to the instruction manual for instructions on how to set the APN (Access Point Name).
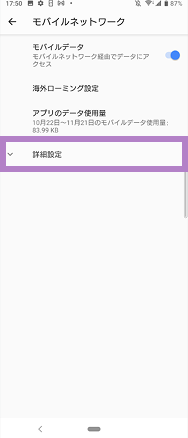
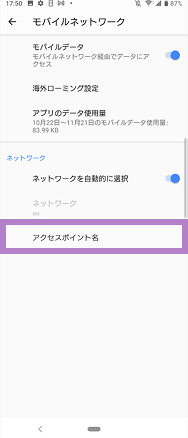
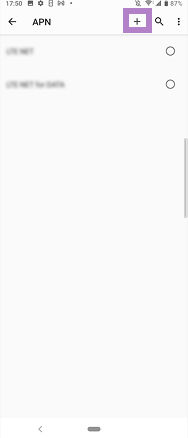
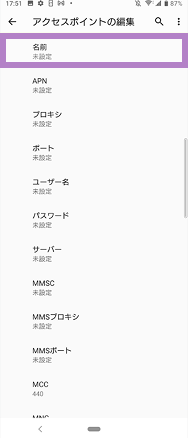
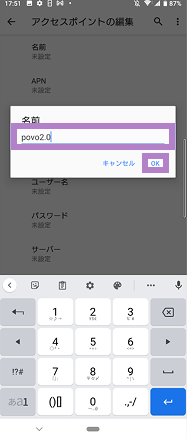
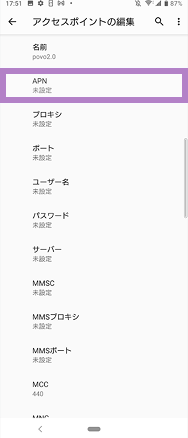

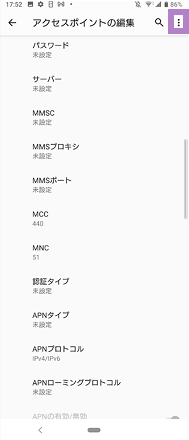
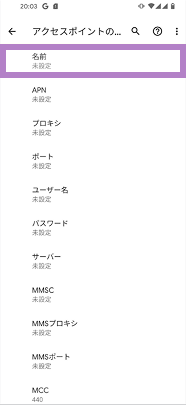
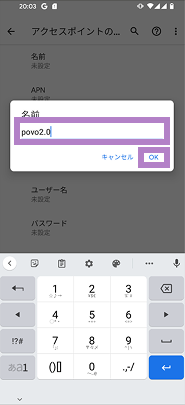
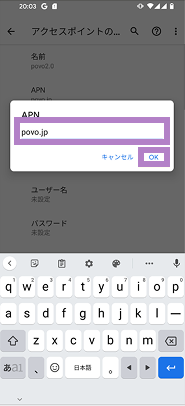
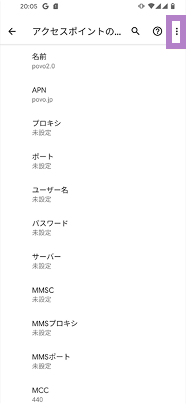
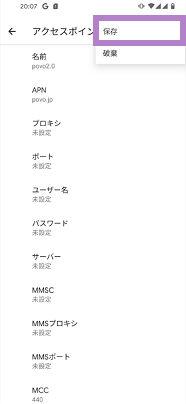
Items to be entered
[Name]
povo2.0
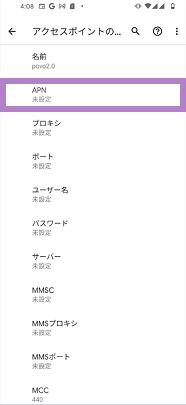
[APN]
povo.jp
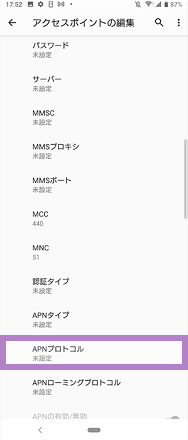
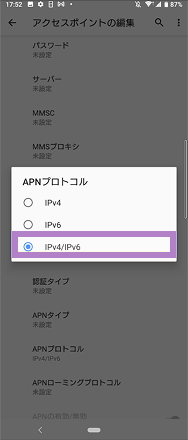
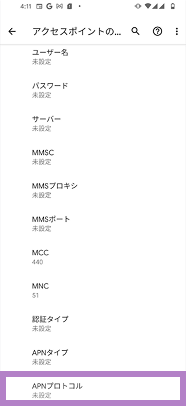
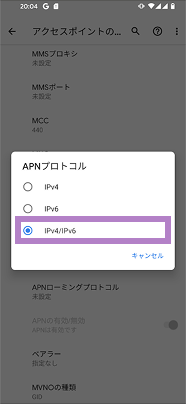
[APN Protocol]
IPv4 / IPv6
Please call the test number (111/toll-free), listen to the guidance to the end, and then hang up.
*The test number (111) cannot be used from outside Japan.
With Wi-Fi turned off, open your browser and check whether you can access the website (https:// povo.jp) using mobile data.
* Before purchasing data Topping, it may take some time for the screen to display, but as long as the screen is displayed, there is no problem. * To access from outside Japan, you will need to purchase "Overseas data Topping."
Once the call test and mobile data communication test are complete, the SIM card activation procedure is complete.
Purchase your Topping and enjoy the world of povo!
A SIM-free or SIM-unlocked device is required. Devices purchased from au do not require SIM unlocking.

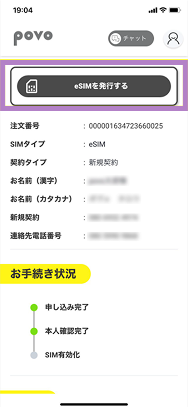
Used on devices before service launch

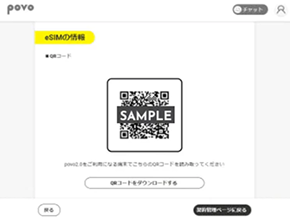
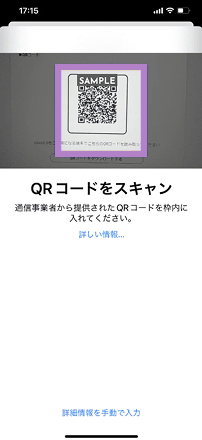
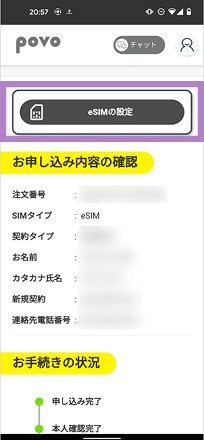
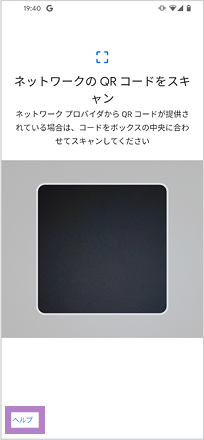
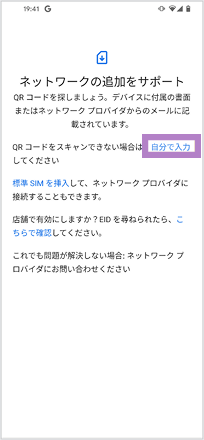
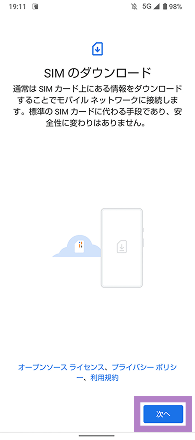
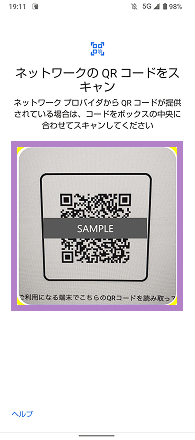
It is necessary to display the QR code.
There is also a way not to use it
\Click here if you want to check the video/
Procedure
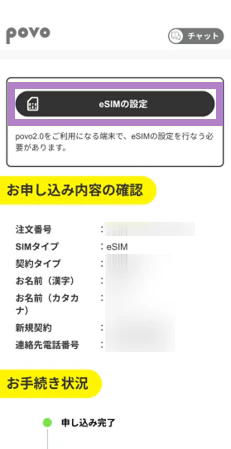
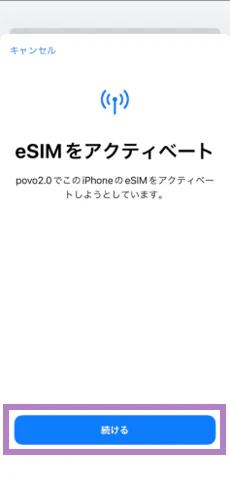
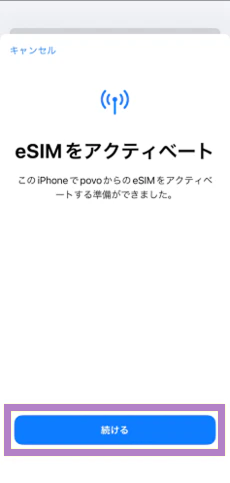
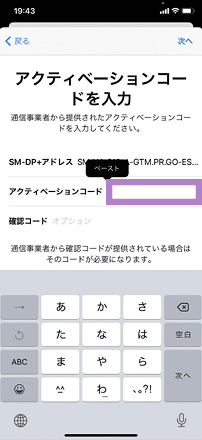
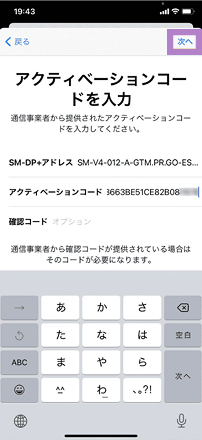
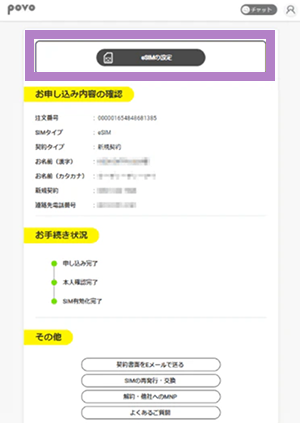
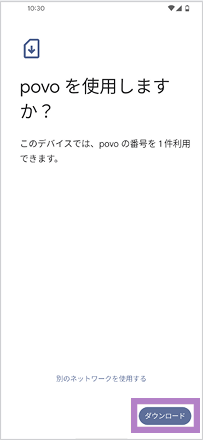
Please ensure that STEP 2 and all subsequent steps are carried out on the device intended for eSIM setup.
Procedure


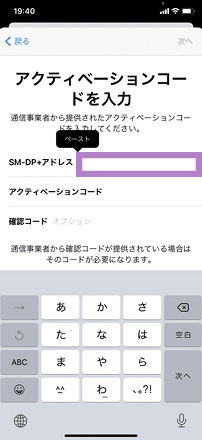
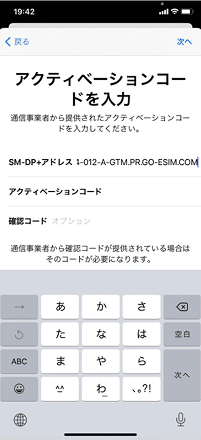
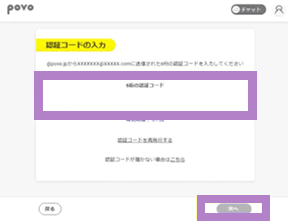
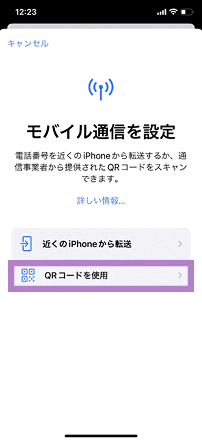
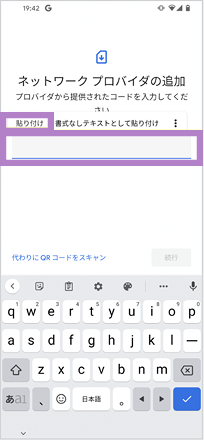
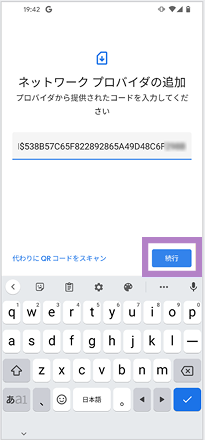
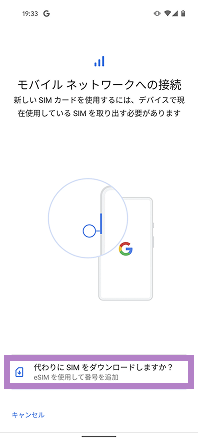
When using one eSIM device (code entry method)
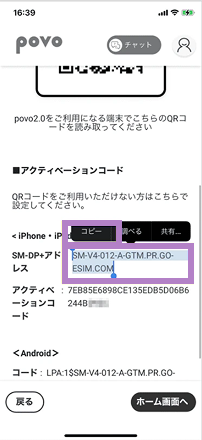

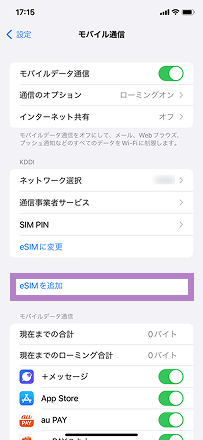

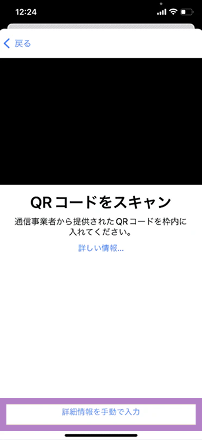
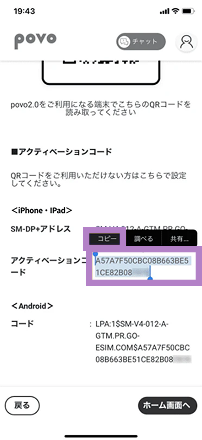


For those with multiple devices (QR code method)

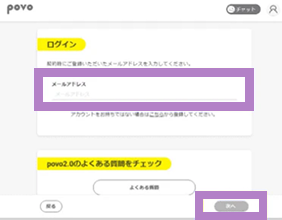


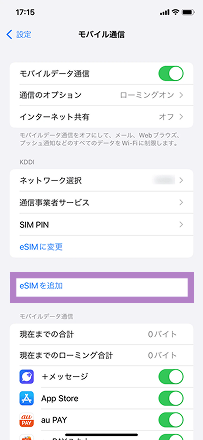
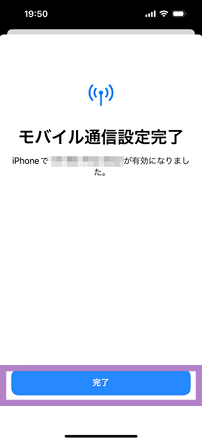
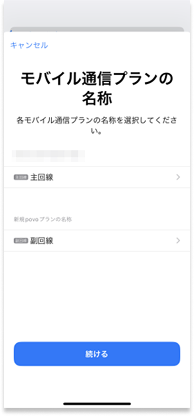
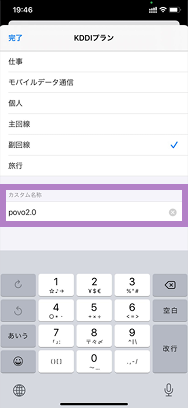
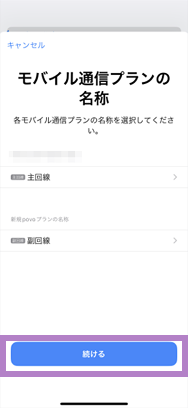
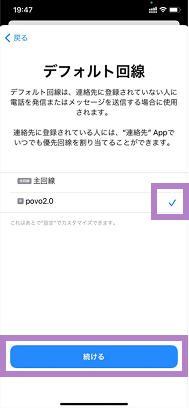
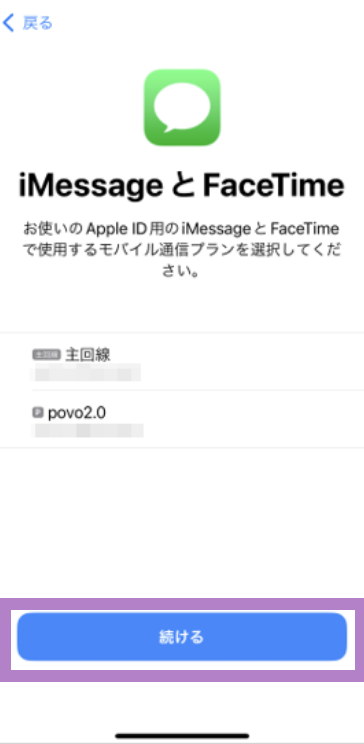
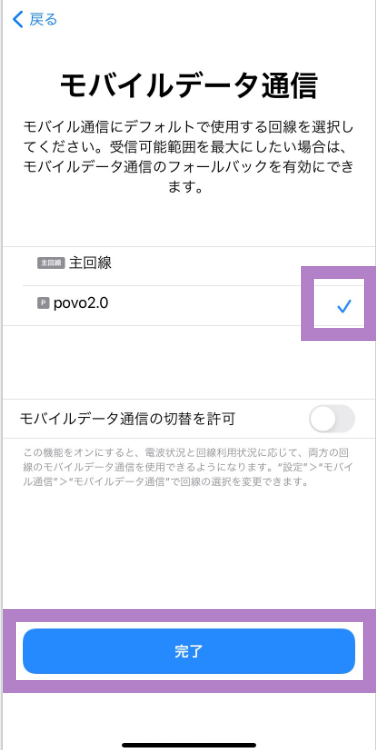
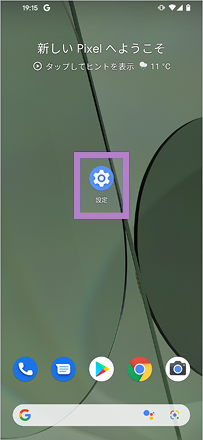
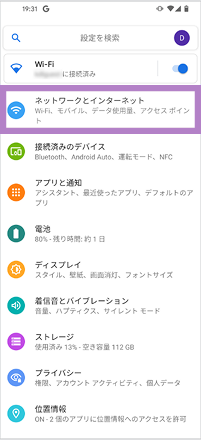
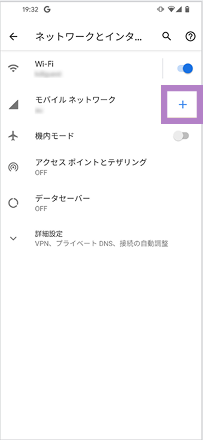
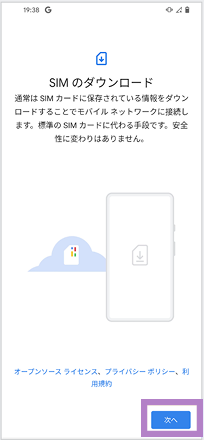
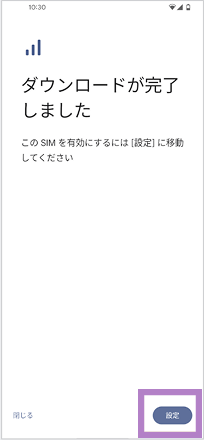
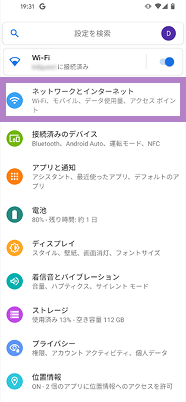
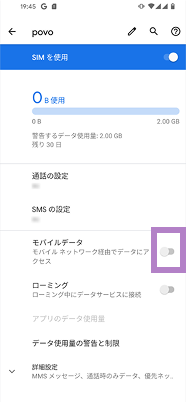
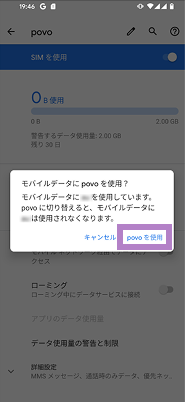
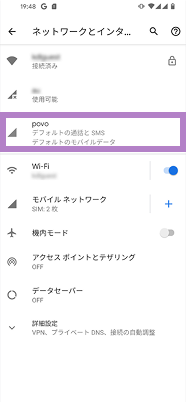
Follow the steps below to set your mobile network to povo2.0.
Procedure


To use povo2.0, you must update to the latest OS.
Please follow the steps below to update your OS.
How to update the OS on your iPhone or iPad
How to install APN settings on iPad
To use povo2.0 on an iPad with iPadOS version earlier than 17.1, you must install the APN settings.
Customers who have configured APN settings for services other than povo
If you have set up an APN setting profile before subscribing to povo2.0, please follow the steps below to delete it.
Please call the test number (111/toll-free), listen to the guidance to the end, and then hang up.
*Not necessary for iPad. *The test number (111) cannot be used from outside Japan.
With Wi-Fi turned off, open your browser and check whether you can access the website (https:// povo.jp) using mobile data.
* Before purchasing data Topping, it may take some time for the screen to display, but as long as the screen is displayed, there is no problem. * To access from outside Japan, you will need to purchase "Overseas data Topping."
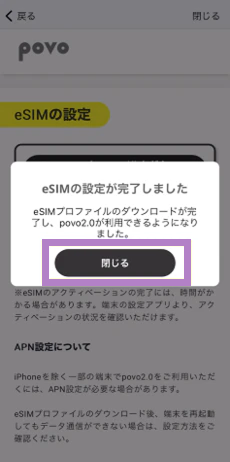
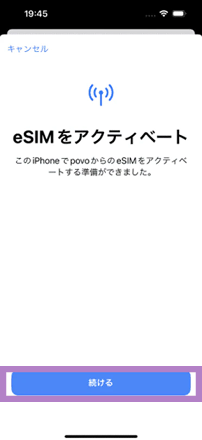
Once the call test and mobile data communication test are complete, the eSIM activation process is complete.
After completing the activation procedure, purchase Topping and enjoy the world of povo!
\Click here if you want to check the video/
The activation procedure for Android varies depending on the model. Please select your model from the list below.
Procedure
Please ensure that STEP 2 and all subsequent steps are carried out on the device intended for eSIM setup.


When using one eSIM device (code entry method)
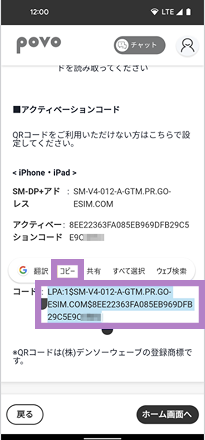
For those with multiple devices (QR code method)


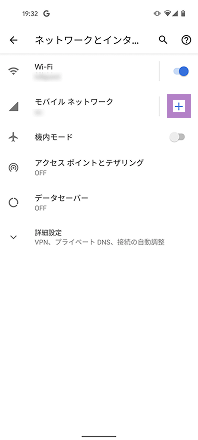

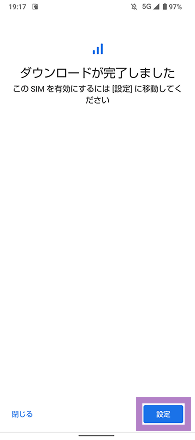
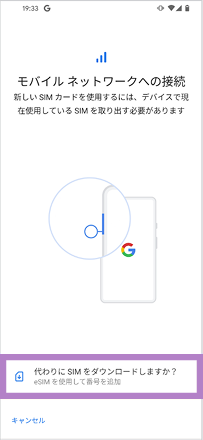
Follow the steps below to set your mobile network to povo.
*If you change from a SIM card to an eSIM, please remove the SIM card you were using previously.


Please set the APN for povo2.0 and select it.
* In most cases, APN settings are required for Android smartphones purchased from au. * If "4G" or "5G" is displayed next to the signal icon, or if data communication is possible with Wi-Fi turned off, this setting is not necessary.
Procedure
*Item names may be displayed differently depending on the model. Please refer to the instruction manual for instructions on how to add an APN (Access Point Name).


Items to be entered
[Name]
povo2.0
[APN]
povo.jp
[APN Protocol]
IPv4 / IPv6
Please call the test number (111/toll-free), listen to the guidance to the end, and then hang up.
*The test number (111) cannot be used from outside Japan.
With Wi-Fi turned off, open your browser and check whether you can access the website (https:// povo.jp) using mobile data.
* Before purchasing data Topping, it may take some time for the screen to display, but as long as the screen is displayed, there is no problem. * To access from outside Japan, you will need to purchase "Overseas data Topping."
Once the call test and mobile data communication test are complete, the eSIM activation process is complete.
After completing the activation procedure, purchase Topping and enjoy the world of povo!
 What is SIM/eSIM?
 Choose from
 How to Get Your Line Activated


